Helm best practices
High-level overview of Helm workflows
Helm is a package manager for Kubernetes (think apt or yum). It works by combining several manifests into a single package called a chart.
Helm also supports storing charts in remote or local Helm repositories that function as package registries, such as Maven Central, Ruby Gems, NPM registry, etc.
Helm is currently the only solution that supports:
- Grouping related Kubernetes manifests in a single entity (the chart)
- Basic templating and values for Kubernetes manifests
- Dependency declaration between applications (chart of charts)
- A registry of available applications to be deployed (Helm repository)
- A view of a Kubernetes cluster at the application/chart level
- Managing of chart installation/upgrades as a whole
- Built-in rollback of a chart to a previous version without running a CI/CD pipeline again
You can find a list of public curated charts in the default Helm repository.
Several third-party tools support Helm chart creation such as Draft. Local Helm development is also supported by garden.io, and/or skaffold. Check your favorite tool for native Helm support.
Codefresh also has built-in support for Helm:
Helm concepts
The official docs do a good job of explaining the basic concepts.
The table below focuses on some important points.
| Helm Concept | Description | Important point |
|---|---|---|
| Chart (unpackaged) | A folder with files that follow the Helm chart guidelines. | Can be deployed directly to a cluster |
| Chart (packaged) | A tar.gz archive of the above. |
Can be deployed directly to a cluster |
| Chart name | Name of the package as defined in Chart.yaml |
Part of package identification |
| Templates | A set of Kubernetes manifests that form an application. | Go templates can be used |
| Values | Settings that can be parameterized in Kubernetes manifests. | Used for templating of manifests |
| Chart version | The version of the package/chart. | Part of package identification |
| App version | The version of the application contained in the chart. | Independent from chart version |
| Release | A deployed package in a Kubernetes cluster. | Multiple releases of the same chart can be active |
| Release name | An arbitrary name given to the release. | Independent from name of chart |
| Release Revision | A number that gets incremented each time an application is deployed/upgraded. | Unrelated to chart version |
| Repository | A file structure (HTTP server) with packages and an index.yaml file. |
Helm charts can be deployed without being first fetched from a repository |
| Installing | Creating a brand-new release from a Helm chart (either unpackaged, packaged or from a repo). | |
| Upgrading | Changing an existing release in a cluster | Can be upgraded to any version (even the same) |
| Rolling back | Going back to a previous revision of a release. | Helm handles the rollback, no need to rerun pipeline |
| Pushing | Storing a Helm package on a repository. | Chart will be automatically packaged |
| Fetching | Downloading a Helm package from a repository to the local filesystem. |
Common Helm misconceptions
Any new technology requires training on how to use it effectively. If you have already worked with any type of package manager, you should be familiar with how Helm works.
Here is a list of important Helm points that are often controversial between teams.
Helm repositories are optional
Using Helm repositories is a recommended practice, but completely optional. You can deploy a Helm chart to a Kubernetes cluster directly from the filesystem. The Helm deployment quick start describes this scenario.
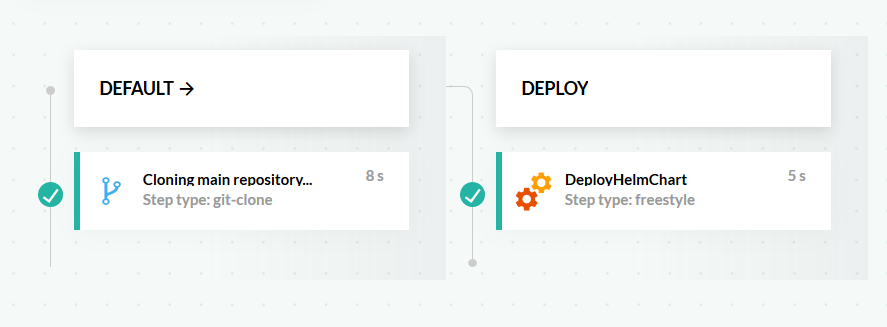
Helm can install a chart either in the package (.tgz) or unpackaged (tree of files) to a Kubernetes cluster right away. Thus, the most minimal Helm pipeline has only two steps:
- Check out from Git a Helm chart described in uncompressed files.
- Install this chart to a Kubernetes cluster.
You will see in the next section more efficient workflows, but the fact remains that Helm repositories are optional. There is no technical requirement that a Helm chart must be uploaded to a Helm repository before being deployed to a cluster.
Chart versions and appVersions
Each Helm chart has the ability to define two separate versions:
- The version of the chart itself (
versionfield inChart.yaml). - The version of the application contained in the chart (
appVersionfield inChart.yaml).
These are unrelated and can be bumped up in any manner that you see fit. You can sync them together or have them increase independently. There is no right or wrong practice here as long as you stick into one. We will see some versioning strategies in the next section.
Charts and sub-charts
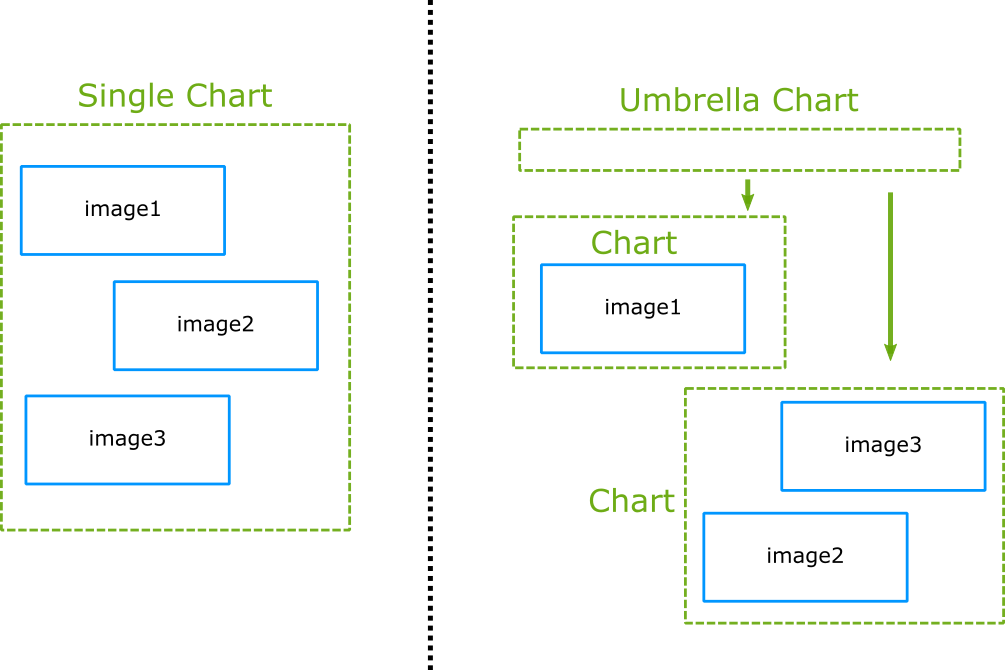
The most basic way to use Helm is by having a single chart that holds a single application. The single chart will contain all the resources needed by your application such as deployments, services, config-maps etc.
However, you can also create a chart with dependencies to other charts (a.k.a. umbrella chart), which are completely external using the requirements.yaml file. Using this strategy is optional and can work well in several organizations. Again, there is no definitive answer on right and wrong here, it depends on your team process.
We will see some scenarios in the next sections on why you would want to use umbrella charts.
Helm vs K8s templates
Helm is a package manager that also happens to include templating capabilities. Unfortunately, a lot of people focus only on the usage of Helm as a template manager and nothing else.
Technically Helm can be used as only a templating engine by stopping the deployment process in the manifest level. It is perfectly possible to use Helm only to create plain Kubernetes manifests and then install them on the cluster using the standard methods (such as kubectl). But then you miss all the advantages of Helm (especially the application registry aspect).
At the time of writing Helm is the only package manager for Kubernetes, so if you want a way to group your manifests and a registry of your running applications, there are no off-the-shelf alternative apart from Helm.
Here is a table that highlights the comparison:
| Helm Feature | Alternative |
|---|---|
| Templating | Kustomize, k8comp, kdeploy, ktmpl, kuku, jinja, sed, awk, etc. |
| Manifest grouping (entity/package) | None |
| Application/package dependencies | None |
| Runtime view of cluster packages | None |
| Registry of applications | None |
| Direct rollbacks and Upgrades | None |
Helm pipelines
With the basics out of the way, we can now see some typical Helm usage patterns. Depending on the size of your company and your level of involvement with Helm you need to decide which practice is best for you.
Deploy from an unpackaged chart
This is the simplest pipeline for Helm. The Helm chart is in the same Git repository as the source code of the application.
The steps are the following:
- Code/Dockerfile/Chart is checked out from Git
- Docker image is built (and pushed to default Docker registry)
- Chart is deployed directly to a Kubernetes Cluster
Notice that in this pipeline there is no Helm repository involved.
TIP
We recommend this workflow only while you are learning Helm. Storing your Helm charts in a Helm repository is a better practice as described in the next section.
Package/push and then deploy
This is the recommended approach when using Helm. First, you package and push the Helm chart into a repository, and then you deploy it to your cluster.
This way your Helm repository shows a registry of the applications that run on your cluster. You can also reuse the charts to deploy to other environments (described later in this page).
The Helm chart can be either in the same Git repository as the source code (as shown above) or in a different one. Note that this workflow assumes that you have attached a Helm repository configuration in the pipeline.
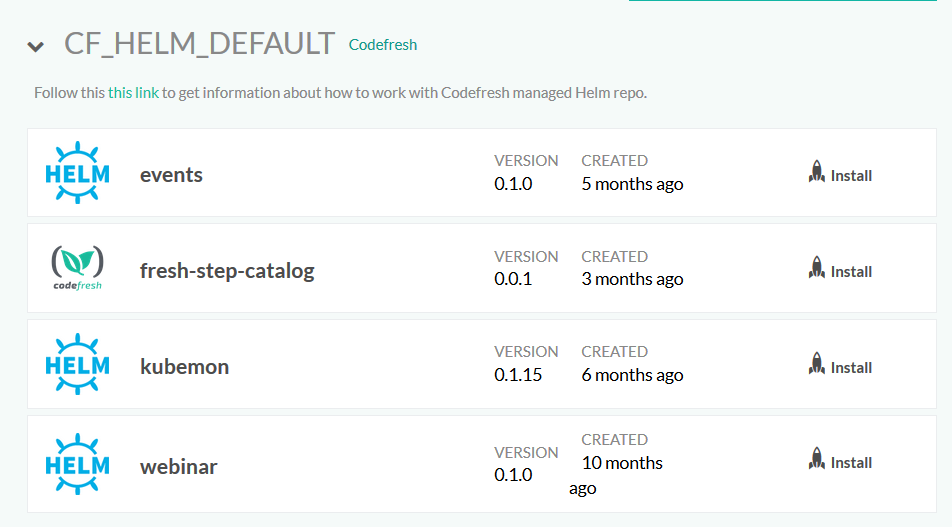
If you use the Codefresh Helm repository you can see all your releases in the Codefresh UI.
This approach allows you also to reuse Helm charts. After you publish a Helm chart, in the Helm repository you can deploy it to another environment (with a pipeline or manually) using different values.
Separate Helm pipelines
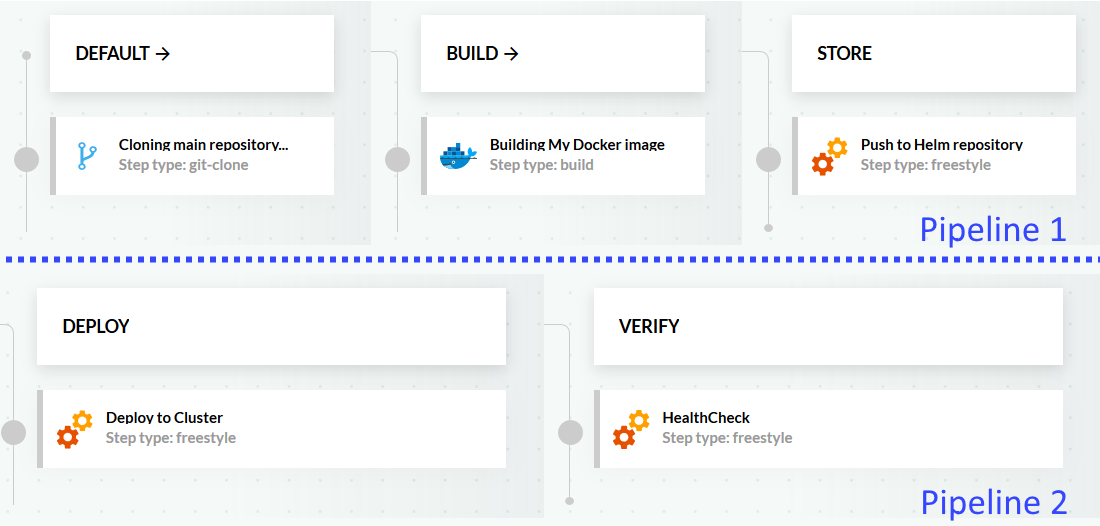
Even though packaging and deploying a release in a single pipeline is the recommended approach, several companies have two different processes for packaging and releasing.
In this case, you can create two pipelines. One that packages the Helm chart and uploads it to a Helm repository, and another one that deploys to a cluster from the Helm chart.
While this approach offers flexible releases (as one can choose exactly what is released and what is not), it also raises the complexity of deployments. You need to pass parameters on the deployment pipeline to decide which chart version will be deployed.
In Codefresh, you can also have the two pipelines automatically linked together.
Using Helm rollbacks
Helm has the native capability of rolling back a release to any previous revision. This can be done manually or via the Codefresh UI.
A more advanced usage would be to automatically rollback a release if it “fails”.
In the example pipeline above, after deployment, we run some smoke tests/health checks. If they fail, then the rollback step is executed using pipeline conditionals.
Alternatively, you can run any other freestyle step after a deployment such as health checks, metric collection, load testing, etc. that decides if a deployment if a Helm rollback is needed or not.
Integrating automatic Helm rollbacks can be used in all kinds of Helm workflows that were described in this section.
Helm packaging strategies
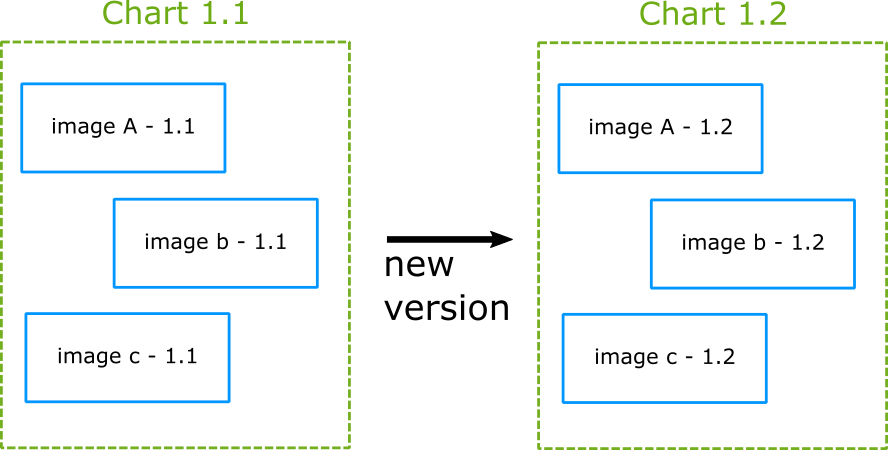
As mentioned before a Helm chart version is completely different than the application version it contains. This means that you can track versions on the Helm chart itself separately from the applications it defines.
Simple 1-1 versioning
This is the most basic versioning approach, and it is the suggested one if you are starting out with Helm.
Don’t use the appVersion field at all (it is optional anyway) and just keep the chart version in sync with your actual application.
This approach makes version bumping very easy (you bump everything up) and also allows you to quickly track what application version is deployed on your cluster (same as chart version).
The downside of this approach is that you can’t track chart changes separately.
Chart versus application versioning
This is an advanced approach which you should adopt if changes are happening in the charts themselves all the time (i.e. in the templates) and you want to track them separately from the application.
An important point here is that you need to adopt a policy in your team on what a “chart change” means. Helm does not enforce chart version changes. You can deploy a different chart with the same version as the previous one. So, if this is something that you want to do, you need to make sure that all teams are on the same page for versioning practices.
On the plus side, this workflow allows you to individually version charts and applications and is very flexible for companies with teams that manage separately the charts from the application source code.
Umbrella charts
Umbrella charts are charts of charts. They add an extra layer of complexity on both previous approaches. You can follow the same paradigms in umbrella charts. Either the parent chart has the same version as everything else (first approach) or it has a version on its own.
In the second case, you need to agree with your team on when exactly the parent chart version should be bumped. Is it only when a child chart changes? Only when an application changes? or both?
The answer does not really matter as long as your team follows the same rules.
Helm promotion strategies
A Helm chart (like a Docker image) should be promoted between environments. It should start with testing and staging environments and gradually move to production ones.
Single repository with multiple environments
This is the most basic deployment workflow. You have a single Helm chart (which is exactly the same across all environments). It is deployed to multiple targets using a different set of values.
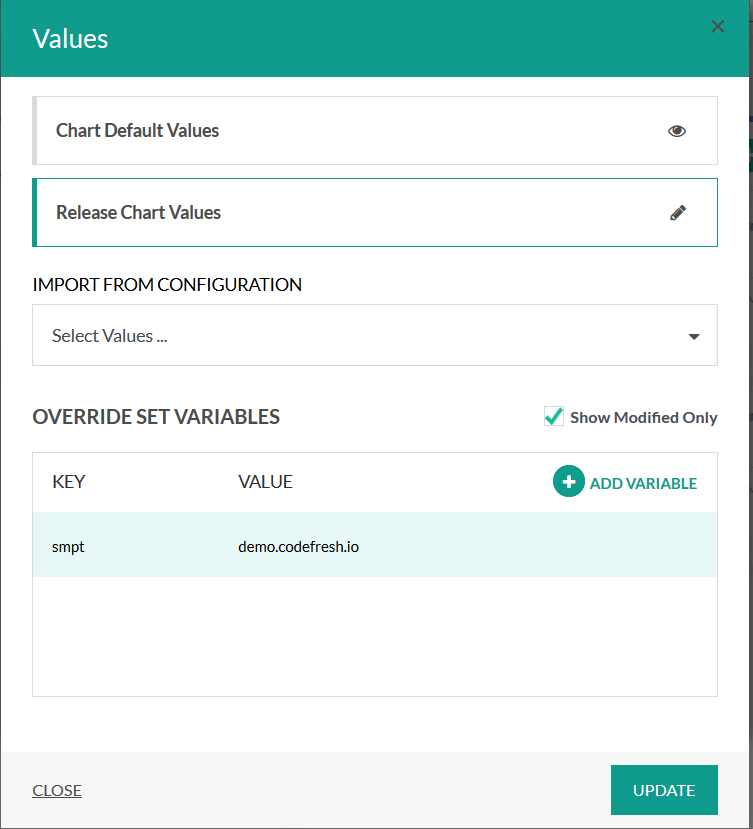
Codefresh has several ways to override the values for each environment within a pipeline.
Chart promotion between environments
This is the recommended deployment workflow. Codefresh can store different Helm values per environment in the shared configuration mechanism. Then you view and manage releases from the Helm environments dashboard.
Then once you promote a Helm release either from the GUI, or the pipeline you can select exactly which configuration set of parameters you want to use:
This workflow has two big advantages:
- You get a visual overview on what and where each Helm release is installed on
- You can promote releases without running the initial CI/CD pipeline (that created the chart)
Chart promotion between repositories and environments
A more advanced workflow (useful in organizations with multi-location deployments) is the promotion of Helm releases between both repositories and environments.
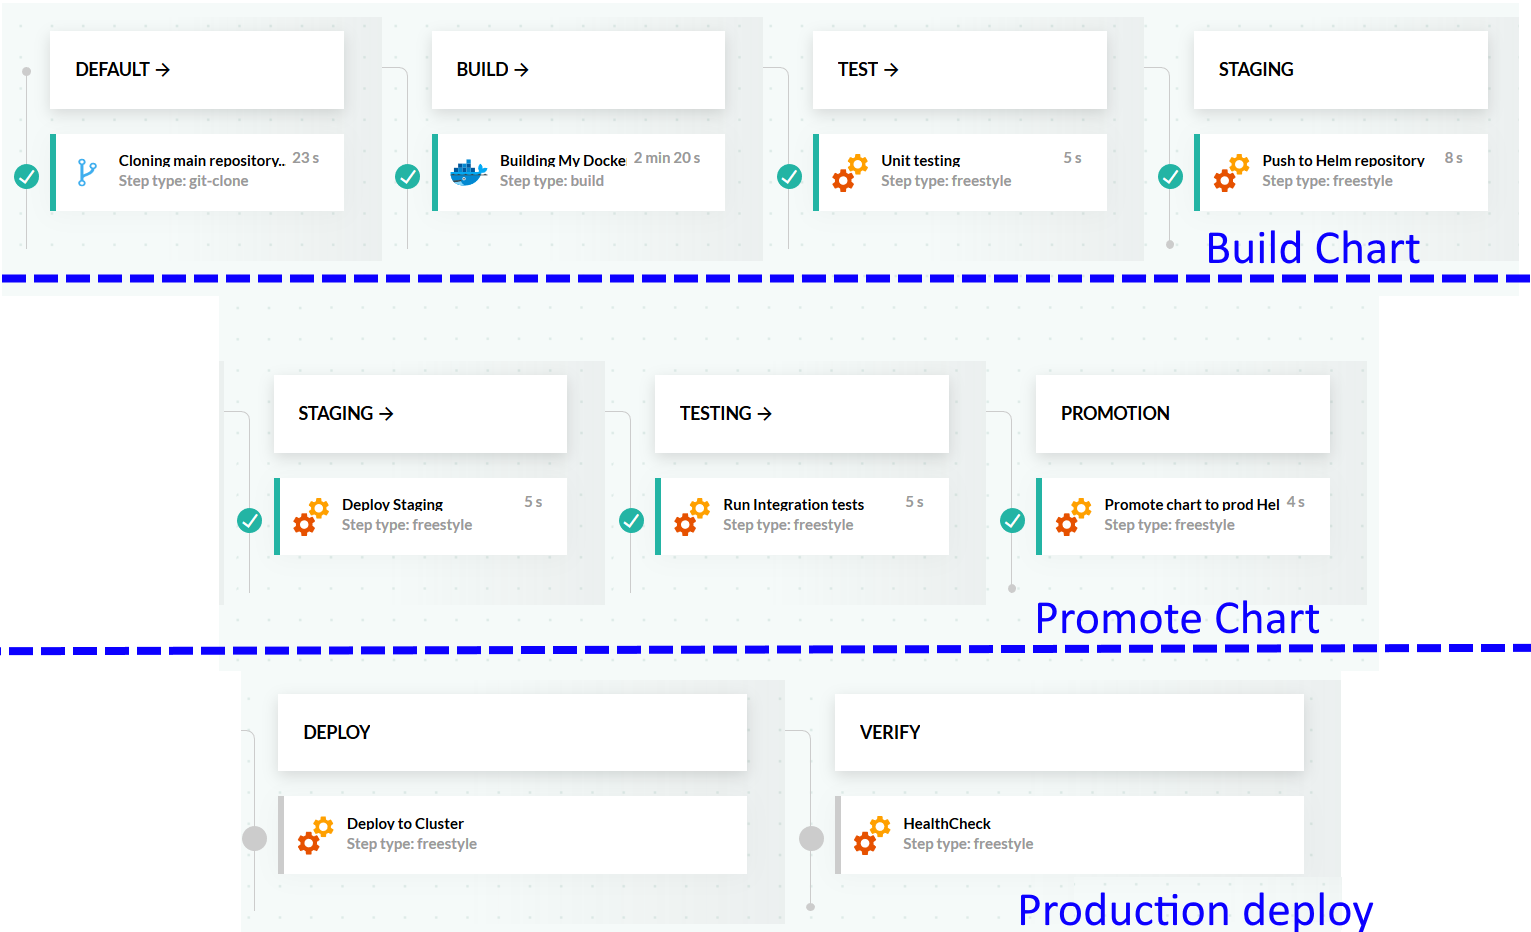
There are different pipelines for:
- Creating the Helm chart and storing it to a staging Helm repository (i.e. the Codefresh Helm repository)
- Deployment of the Helm chart to a staging environment. After it is tested the chart is promoted to one or more “production” Helm repositories
- Deployment of the promoted Helm chart happens to one of the production environments
While this workflow is very flexible, it adds complexity on the number of Helm charts available (since they exist in multiple Helm repositories). You also need to set up the parameters between the different pipelines so that Helm charts to be deployed can be indeed found in the expected Helm repository.
Related articles
Helm quick start guide
Using Helm in a Codefresh pipeline
Helm Dashboard
Helm Promotion boards
