Variables in pipelines
Variables in pipelines allow you to parameterize the way your pipeline works.
Codefresh provides a set of system variables, and also provides the capability to define custom variables.
- System variables are predefined variables prefixed with
CF.
System variables are automatically included in every pipeline build. Here are some examples of system variables.CF_BRANCHis the Git branch that was used for this pipeline.CF_REVISIONis the Git hash that was used for this pipeline.CF_BUILD_URLis the url of the pipeline build.
- User-defined variables are custom variables which you create.
You can create user-defined variables for different entities such as projects, pipelines and steps, with or without default values. You can also import variables you may have already defined.
Codefresh supports two syntaxes for variables: the UNIX syntax, and a proprietary syntax for use in YAML files.
Using Codefresh variables in pipelines
There are two ways to use a Codefresh variable in your pipelines:
- Expose as UNIX environment variables
This is the default method. All variables in allfreestylesteps are exposed as UNIX environment variables. For example,$MY_VARIABLE_EXAMPLE. - Directly in YAML properties
This format, specific to Codefresh, can be used in in YAML properties with the syntax${{MY_VARIABLE_EXAMPLE}}.
TIP
If you are unsure about which format to use, feel free to use the Codefresh-specific format with the ${{MY_VARIABLE_EXAMPLE}} everywhere.
This is the Codefresh specific format and should function in all sections of codefresh.yml.
Example: Print out the branch as an environment variable
In this example, we use simple echo commands, but any program or script that reads environment variables can also read them in the same manner.
YAML
MyOwnStep:
  title: Variable example
  image: alpine
  commands:
    - echo $CF_BUILD_ID
    - echo $CF_BRANCH_TAG_NORMALIZED
Example: Use variable directly in YAML properties
YAML
MyAppDockerImage:
  title: Building Docker Image
  type: build
  image_name: my-own-app
  tag: ${{CF_BRANCH_TAG_NORMALIZED}}
Example: Concatenating variables
YAML
MyAppDockerImage:
  title: Building Docker Image
  type: build
  image_name: my-own-app
  tag: ${{CF_BRANCH_TAG_NORMALIZED}}-${{CF_SHORT_REVISION}}
The concatenation above creates Docker images with tags such as:
master-df6a04c
develop-ba1cd68
feature-vb145dh
NOTE
This syntax is specific to Codefresh, and is only available within the Codefresh YAML file itself.
To write scripts or programs that use Codefresh variables, you need to make them aware of the environment variable form.
System variables
System variables are automatically injected to any freestyle step as environment variables.
Git-based system variables
The values of Git-based system variables, such as CF_BRANCH, CF_COMMIT_MESSAGE, CF_REVISION etc. are retrieved directly from the Git provider you use, and therefore have the same limitations of that provider.
For example, GitLab sends less information in Pull Request (PR) events than normal pushes, and Bitbucket sends only the short hash of a commit in PR events. We suggest you read the documentation of your Git provider first to understand what information is available for every Git event.
Gerrit for example, has change-Id and Changes that you can map to CF_PULL_REQUEST variables, such as CF_PULL_REQUEST_ID and more.
The table below describes the system variables.
| Variable | Description |
|---|---|
${{CF_REPO_OWNER}} |
The repository owner. |
${{CF_REPO_NAME}} |
The repository name. |
${{CF_BRANCH}} |
The branch name or tag (depending on the payload JSON) of the Git repository associated with the main pipeline at the time of execution. - To utilize the normalized version of the branch name, use ${{CF_BRANCH_TAG_NORMALIZED}}. This variable ensures that special characters are removed, resulting in a branch name without any characters that are illegal for use as a Docker image tag name.- For a normalized version in lowercase, you can use ${{CF_BRANCH_TAG_NORMALIZED_LOWER_CASE}}. |
${{CF_BASE_BRANCH}} |
The base branch from which the tag is created. |
${{CF_PULL_REQUEST_ACTION}} |
The PR (Pull Request) action with values based on the Git provider. - GitHub -GitLab -Bitbucket |
${{CF_PULL_REQUEST_ID}} |
The ID of the Pull Request (PR). For Gerrit, use this in place of changeId. |
${{CF_PULL_REQUEST_TARGET}} |
The target branch of the PR. For Gerrit, use this in place of Change target branch name. |
${{CF_PULL_REQUEST_NUMBER}} |
The PR (Pull Request) number. |
${{CF_PULL_REQUEST_LABELS}} |
For GitHub and GitLab, the labels assigned to the PRs. For Gerrit, the change hashtags. |
${{CF_PULL_REQUEST_COMMENT}} |
The comment added to the PR. For Gerrit, use this in place of Change message. |
${{CF_PULL_REQUEST_COMMENT_AUTHOR}} |
The user who added the comment to the PRt. For Gerrit, use this in place of Change author. |
${{CF_GERRIT_CHANGE_TOPIC}} |
The topic associated with the Gerrit change. |
${{CF_COMMIT_AUTHOR}} |
The name of the user who authored the commit. |
${{CF_BUILD_INITIATOR}} |
The username of the user who initiated the build. If the build is initiated by a Git webhook, as for example from a PR, this variable returns the webhook user. If the build is restarted manually, the variable always returns the username of the person who restarted the build. |
${{CF_ACCOUNT}} |
The Codefresh account for this build. |
${{CF_COMMIT_URL}} |
The commit URL. |
${{CF_COMMIT_MESSAGE}} |
The commit message of the Git repository revision at the time of execution. Only quotes in the message are escaped ( ' is escaped \' and " is escaped as \").To get the title of the pull request, use ${{CF_PULL_REQUEST_TITLE}}. |
${{CF_COMMIT_MESSAGE_ESCAPED}} |
The commit message of the Git repository revision at the time of execution with special characters escaped. To get the escaped title of the pull request, use ${{CF_PULL_REQUEST_TITLE_ESCAPED}}. |
${{CF_PULL_REQUEST_TITLE}} |
The unescaped title of the pull request that triggered the pipeline build. To escape special characters, use ${{CF_PULL_REQUEST_TITLE_ESCAPED}}. |
${{CF_PULL_REQUEST_TITLE_ESCAPED}} |
The title of the pull request that triggered the pipeline build, with special characters escaped. To not escape special characters, use ${{CF_PULL_REQUEST_TITLE}}. |
${{CF_REVISION}} |
The revision of the Git repository of the main pipeline, at the time of execution. To get the abbreviated 7-character revision hash as used in Git, use ${{CF_SHORT_REVISION}}. NOTE: To tag the image as a string with quotes, use ${{CF_SHORT_REVISION}} . |
${{CF_VOLUME_NAME}} |
The shared volume defined in compositions. |
${{CF_VOLUME_PATH}} |
The mounted path of the shared volume within a freestyle container. In the current implementation it expands to /codefresh/volume. |
${{CF_BUILD_TRIGGER}} |
The indication of how the current build was triggered:
|
${{CF_BUILD_ID}} |
The build ID. NOTE: To use this variable as a string to tag the image, enclose it in quotes, "${{CF_BUILD_ID}}". |
${{CF_BUILD_TIMESTAMP}} |
The timestamp when the build was created. NOTE: To use this variable as a string to tag the image, enclose it in quotes, "${{CF_BUILD_TIMESTAMP}}". |
${{CF_BUILD_URL}} |
The URL to the build in Codefresh. |
${{CF_PIPELINE_NAME}} |
The full path of the pipeline, including the project to which it is assigned, if any, as in “project/pipeline”. |
${{CF_STEP_NAME}} |
The name of the step, for example, “MyUnitTests”. |
${{CF_URL}} |
The URL of the Codefresh platform. |
${{CF_OUTPUT_URL}} |
Display link to an external URL on step execution. For example, display the link to a parent-build from the child-build. See Export external link with CF_OUTPUT_URL in this article. |
${{CI}} |
The value is always true. |
${{CF_KUBECONFIG_PATH}} |
Path to injected kubeconfig if at least one Kubernetes cluster is configured. You can easily run custom kubectl commands since it is automatically set up by Codefresh in all pipelines. |
Context-related variables
Context-related variables are system variables created dynamically during the workflow execution, according to the steps used in the pipeline.
| Variable | Description |
|---|---|
| Working Directories | For example, you can set the working directory of step A with a variable named after a previously executed step, step B. Therefore, setting step A with working-directory:${{B}} means that step A executes in the same working directory as step B. |
| Images | You can set the candidate field of the push step with a variable named after a previously executed build step. Since the details of the created image are not necessarily known ahead of time, the variable can create an association to an optionally dynamic image name. Therefore, setting push step A with candidate:${{B}} means that step A will push the image built by step B. Note that this capability works only for candidate and image fields in Codefresh steps. |
A very common pattern in Codefresh pipelines, is to create a Docker image in one step, and then run a command on its container in the next step (e.g. run unit tests):
YAML
version: '1.0'
steps:
  MyAppDockerImage:
    title: Building Docker Image
    type: build
    image_name: my-own-app
  MyUnitTests:
    title: Running Unit tests
    image: ${{MyAppDockerImage}}
    commands:
      - ./my-unit-tests.sh
In the example above, you can see the MyAppDockerImage variable that denotes a Docker image created dynamically within this single pipeline. In the second step we use it as a Docker context in order to run unit tests. See also the unit testing example app.
Step variables
Every step in a Codefresh pipeline also exposes several built-in variables. You can access them via the global steps parent variable.
Each step creates a variable based on the name of the step. You can then use the members of each variable for status conditions such as: steps.MyUnitTests.result == 'error' for a step called MyUnitTests.
To access variables that have non-standard names with only alphanumeric and underscore (_) characters, use the Variable() function.
Step-member variables
Variables that are created by steps can have members. The members depend on the step type.
For example, if you have a build step named myBuildStep, you can get the ID of the docker image that is created, with echo ${{steps.myBuildStep.imageId}}.
| Step Type | Members |
|---|---|
| All step types |
|
| Freestyle | - |
| Composition | - |
| Build |
|
| Git-clone |
|
| Push |
|
| Approval |
|
GitHub release variables
GitHub allows you to create releases to mark specific Git tags for general availability.
You can set a trigger for GitHub releases. When there is a GitHub release, the following variables are also available:
| Variable | Description |
|---|---|
${{CF_RELEASE_NAME}} |
The GitHub release title. |
${{CF_RELEASE_TAG}} |
The Git tag version. |
${{CF_RELEASE_ID}} |
The internal ID for the release. |
${{CF_PRERELEASE_FLAG}} |
Indicates if the release is production-ready or not.true: The release is marked as non-production ready.false: The release is ready for production. |
GitHub Pull Request variables
The table lists the variables available when a PR (Pull Request) is closed in GitHub.
| Variable | Description |
|---|---|
${{CF_PULL_REQUEST_MERGED}} |
Set to:true: The PR was merged to base branch.false: The PR was not merged. |
${{CF_PULL_REQUEST_HEAD_BRANCH}} |
The head branch of the PR, which is the branch to be merged to master. |
${{CF_PULL_REQUEST_MERGED_COMMIT_SHA}} |
The commit SHA on the base branch after the PR was merged. In most cases it will be the master. |
${{CF_PULL_REQUEST_HEAD_COMMIT_SHA}} |
The commit SHA on the head branch, which is the branch to push to master. |
Gerrit changeId & change message variables
Gerrit has no explicit concept of PRs as in other version control systems to map trigger event payloads to builds. Instead, Gerrit uses Changes which serves a similar purpose and functionality as PRs. You can achieve the same functionality in Codefresh with our CF_PULL_REQUEST group of environment variables.
| Variable | Description |
|---|---|
${{CF_PULL_REQUEST_ID}} |
The change identified by the change-Id. |
${{CF_PULL_REQUEST_TARGET}} |
The target branch of the pull request. For Gerrit, use this in place of Change target branch name. |
${{CF_PULL_REQUEST_COMMENT}} |
The comment added to the pull request. For Gerrit, use this in place of Change message. |
${{CF_PULL_REQUEST_COMMENT_AUTHOR}} |
The user who added the comment to the pull request. For Gerrit, use this in place of Change author. |
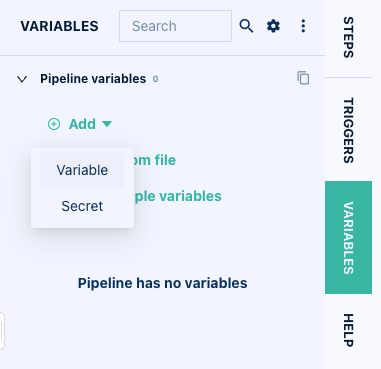
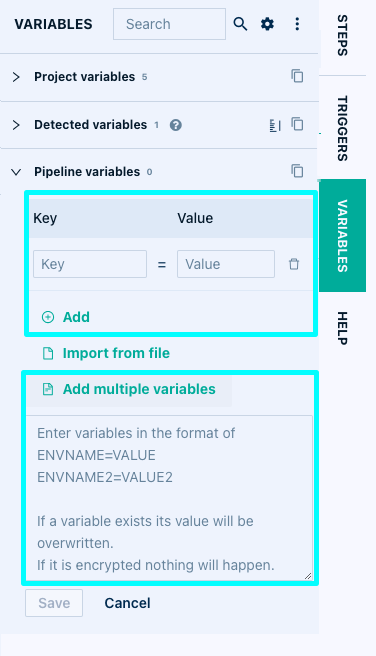
User-defined variables
User-defined variables are custom variables you add to CI entities such as projects, pipelines, build triggers, and manual build runs. When adding a user-defined variable, you can create a:
- Variable
A standard variable whose value is visible in plain text unless explicitly encrypted. You can create these manually, import them from a file with predefined values, or define empty variables without assigned values. - Secret
A variable whose value is automatically encrypted and masked in logs.
NOTE
Secret variables are currently not supported in on-premises environments.
Methods to define user-defined variables
These are the options available to add user-defined variables.
- Add single variable
Supported for all entities, this method allows you to add one variable at a time, with or without values. You cannot encrypt empty variables. - Add multiple variables
Add a set of variables by entering them manually, or by pasting them into the variable editor, one variable per line.
This is a quick option to add variables defined locally or in specific environments to a pipeline.
You simply copy the set of variables and paste them into the text editor. - Import from file
Add predefined variables in bulk by importing from a file.
Empty user-defined variables
If you add variables with just the key definitions, the values are automatically populated during pipeline execution or can be defined manually prior to build runs. You can add empty variables to:
- Projects
- Pipelines
- Build triggers
NOTE
Encryption is not supported for empty variables.
Order of precedence for user-defined variables
Because you can add user-defined variables to different entities, you can have the same variables at different levels.
If the variable with the same name is defined for multiple entities, the override rules are based on the priority of the variable. Variables for entities with higher priority override those for entities with lower priority.
For example if a pipeline variable is defined both within a project, and as an execution parameter of a specific build, the final result will be the value of the variable defined as a build parameter. The project-level variable is ignored.
Listed below are the different levels for user-defined variables in order of priority, from the highest to the lowest.
- Steps
exportcommand
Within the current step usingexport, or in any subsequent step using cf_export commands.freestylesteps withenvironmentfield.
NOTE
Step-level variables withexporttake precedence over freestyle-step variables withenvironment. - Builds
- Within a specific build execution from the Codefresh UI or from the CLI.
- Pipeline
- Shared-configurations
- Projects
The variables are injected into pipelines from different sources and at different levels. To view the variables actually used by a specific build of the pipeline, see Viewing variables in pipeline builds.
Add user-defined variables
- Select the entity to which to add variables:
- Select the type of variable to add: Variable or Secret.
Standard variables
- Add single or multiple variables manually as key-value pairs, or import them in bulk from a file.
- To encrypt a variable, click
 Encrypt, and confirm.
- Secret variables
- Secrets are automatically encrypted and become immutable once saved.
- Decrypting a secret resets its value to empty.
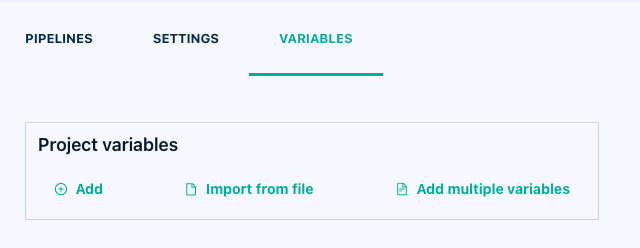
Projects
From the list of Projects, select the Project to which to add variables, click the Settings icon, and then click the Variables tab.
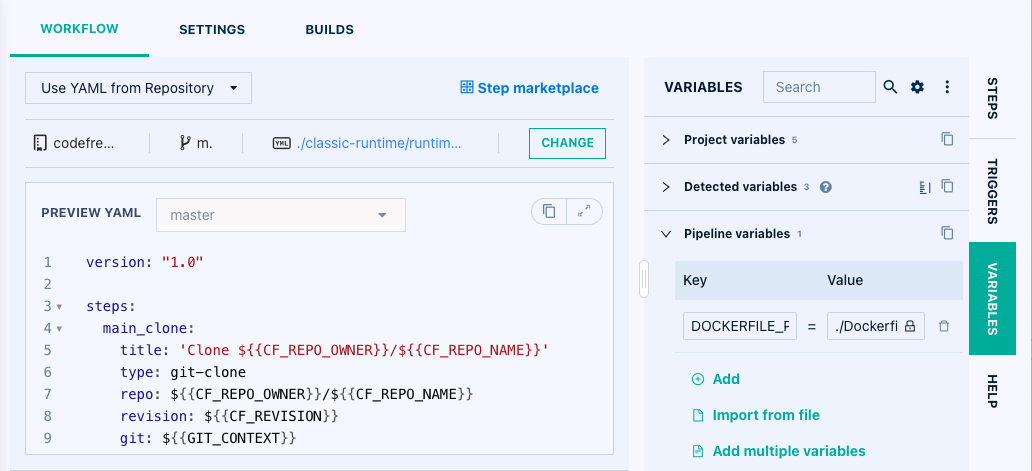
Pipelines
- From the list of pipelines, select the Pipeline to which to add variables.
- Click the Settings icon, click the Workflow tab, and then click Variables on the right.
Steps
- Select the pipeline.
- In the Workflow tab, add the variable with the correct syntax to the step as required.
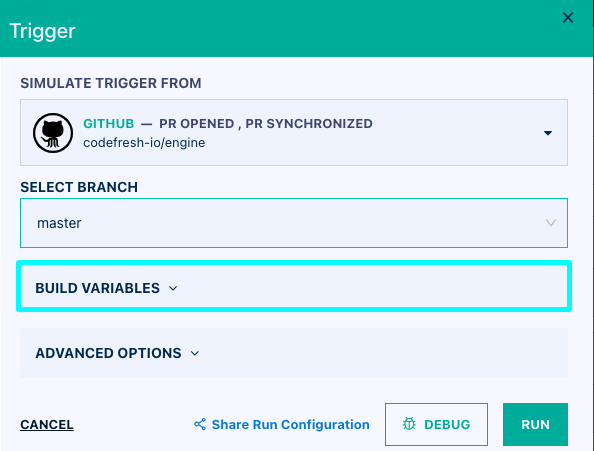
Builds
- From the Builds page, in the Pipelines column, click the pipeline name.
- Click Run.
- Expand Build Variables.
Exporting environment variables from a freestyle step
Steps defined within steps are scoped to the step within which they were created, even when using the export command.
To use variables across steps, we provide a shared file through which you can import and export variables.
There are two ways to add variables to the shared file:
- Using the
cf_exportcommand - Writing directly to the file
Exporting variables with cf_export
Within every freestyle step, the cf_export command allows you to export variables across steps by writing to the shared variables file.
NOTE The default behavior for
cf_exportis to override the variable value passed at the pipeline level. Depending on when your account was created, existing variables may not inherit the default override behavior.
If you are experiencing situations where you are passing a variable to a pipeline, resetting the value viacf_export, and not seeing the desired value for future steps, please contact Support. Support can verify the behavior, and enable the Feature Flag for the account.
You can either:
- Explicitly state a VAR=VAL pair
- State the name of an existing exported environment variable, for example,
EXISTING_VAR
version: '1.0'
steps:
  freestyle-step-1:
    description: Freestyle step..
    title: Free styling
    image: alpine:latest
    commands:
      # Normal export will only work in a single step
      - export EXISTING_VAR=www.example.com

      # CF export will now work in all other subsequent steps
      - cf_export VAR1=alpine:latest VAR2=VALUE2 EXISTING_VAR

  freestyle-step-2:
    description: Freestyle step..
    title: Free styling 2
    image: ${{VAR1}}
    commands:
      - echo $VAR2
      - echo http://$EXISTING_VAR/index.php
By default, cf_export variables work only on subsequent steps, meaning the steps that follow the step in which the variable is defined.
To export a variable both to the current step and to all the remaining steps, do the following:
export MY_VAR='example' # Makes MY_VAR available in this step only
cf_export MY_VAR='example' # Makes MY_VAR available also to all steps after this one
cf_export syntax
cf_export has the same syntax as the bash export command.
This means that when you use cf_export, you don’t need to add dollar signs for the variable that is created/assigned.
cf_export $MY_VAR # Don't do this
cf_export MY_VAR # Correct syntax
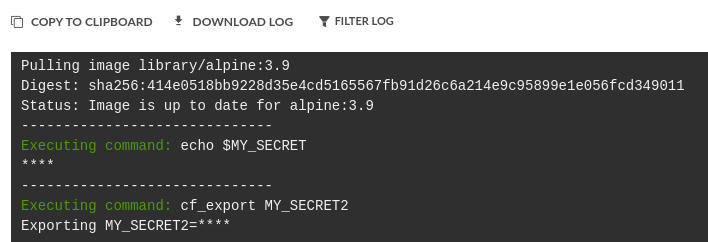
Masking variables within cf_export
Mask variables within cf_export by defining the --mask flag.
Values of masked variables in cf_export commands are replaced with asterisks in the build logs. This helps to ensure that sensitive information is not exposed also in the variables list, in addition to the logs.
Here is an example with standard and masked versions of the same variable in cf_export commands.
version: '1.0'
steps:
  freestyle-step:
    description: Freestyle step..
    title: Free styling
    image: alpine:latest
    commands:
      - export EXISTING_VAR=some-value

      - cf_export VAR1=alpine:latest VAR2=VALUE2 EXISTING_VAR --mask #masked version
Multi-line variables with cf_export
When exporting a multi-line variable using cf_export, to prevent truncation, encode it in base64.
version: "1.0"
steps:
  assign:
    image: alpine
    commands:
      - apk add --update coreutils
      - export TEST=`echo "line1" && echo "line2" && echo "line3"`
      - echo $TEST
      - cf_export TEST=`echo $TEST | base64 -w 0`
  test:
    image: alpine
    commands:
      - echo $TEST
      - echo `echo $TEST | base64 -d`
Directly writing to the file
For more advanced use cases, you can write directly to the shared variable file that Codefresh reads to understand which variables need to be available to all steps.
This file has a simple format where each line is a variable, and its value in the form of VARIABLE=VALUE.
The cf_export command mentioned in the previous section is just a shorthand for writing on this file.
The variables file is available inside freestyle steps in the following path: ${{CF_VOLUME_PATH}}/env_vars_to_export.
version: '1.0'
steps:
  freestyle-step-1:
    description: Freestyle step..
    title: Free styling
    image: alpine:latest
    commands:
      - echo VAR1=192.168.0.1 >> ${{CF_VOLUME_PATH}}/env_vars_to_export
      - echo hey=alpine:3.9 >> ${{CF_VOLUME_PATH}}/env_vars_to_export

  freestyle-step-2:
    description: Freestyle step..
    title: Free styling 2
    image: ${{hey}}
    commands:
      - echo http://$VAR1/index.php
Use this technique if you have complex expressions that have issues with the cf_export command.
Exporting external link with CF_OUTPUT_URL
Use the CF_OUTPUT_URL variable to export any external in the form of a URL.
This variable can be useful to output the URL of the parent pipeline, and navigate from the child to the parent build. Remember that Codefresh has native support to trigger child builds from parent builds, and to navigate from the parent to the child build through the codefresh-run plugin (link).
Add CF_OUTPUT_URL with cf_export
Simply add a step to the child build with an in-step link to the parent build. The URL link to the parent build is displayed as part of the step details in the Builds page.
Create a link to the parent-build using cf_export and CF_OUTPUT_URL.
Example step in child build to output link to parent
Add the following step at the beginning of the pipeline.
NOTE
The name of the variable exported bycf_exportmust have the format<name|key_of_step>_CF_OUTPUT_URL. It’s value is the URL of the parent build to link to.
    steps:
      ...
      linkToParentBuild:
        image: codefresh/cli
        commands:
          - export parentBuildId=$(codefresh get annotation build ${{CF_BUILD_ID}} cf_predecessor -o json | jq -r '.value')
          - cf_export linkToParentBuild_CF_OUTPUT_URL="${{CF_URL}}/build/${parentBuildId}"
      ...
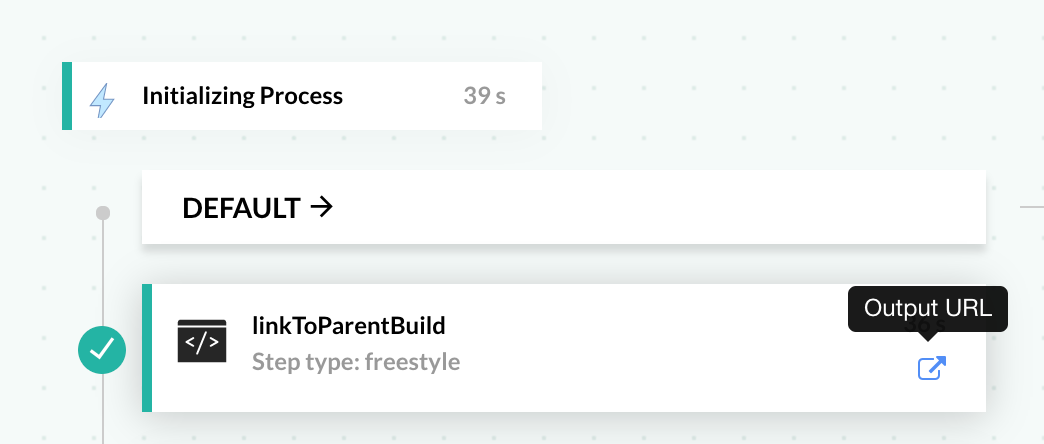
On the Builds page, the step details of the child build displays the Output URL which is the link to the parent build, as in the image below.
Masking variables in logs
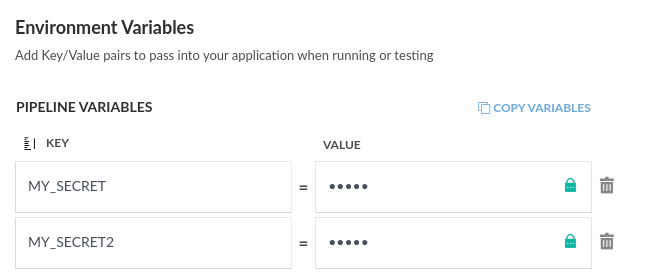
Codefresh has the built-in capability to automatically mask encyrpted variables in logs. In build logs, the values of encrypted variables are replaced with asterisks.
The variables can be defined in any of the usual ways Codefresh offers, such as shared configuration or within the pipeline:
NOTE This feature is currently available only in Enterprise accounts.
Escape special characters in variables
When passing special characters through environment variables, use \ as an escape character.
For example, to pass a Cassandra connection string, you might do something like Points\=hostname\;Port\=16376\;Username\=user\;Password\=password.
This will safely escape ; and =.