Hybrid GitOps Runtime installation
Provision Hybrid GitOps Runtimes through Helm
IMPORTANT
We have transitioned to a Helm-based installation for Hybrid GitOps Runtimes for improved experience and performance, which is now the default Runtime for GitOps.
The CLI-based installation for Hybrid GitOps is considered legacy. We will deprecate this installation mode permanently in the coming months.
You can migrate existing CLI-based GitOps Runtimes to Helm-based ones, as described in Migrating GitOps Runtimes from CLI to Helm.
For GitOps, Codefresh offers the option of installing Hosted and Hybrid GitOps Runtimes. For a comparison, see Hosted vs. Hybrid GitOps.
This article walks you through the process of installing Hybrid GitOps Runtimes in your Codefresh accounts using Helm charts.
For Hosted GitOps Runtime installation, see Hosted GitOps Runtime installation.
Number of Hybrid GitOps Runtimes
Within the same account, you can install one Hosted and one Hybrid GitOps Runtime on a cluster.
For additional Hybrid GitOps Runtimes in the same account, each Runtime must be installed on a different cluster, and must have a unique name.
Installation options for GitOps Runtimes
There are two options for Hybrid GitOps Runtime installation via Helm, each catering to specific use cases:
-
Clean cluster installation with only GitOps Runtime
The clean cluster installation option is suitable for environments where you want to deploy the GitOps Runtime on a cluster without Argo CD. The installation cluster should be free of Argo Project components. GitOps Runtime installation on a clean cluster also installs Argo Project components as part of the installation process, -
Cluster with existing Argo CD
If you have a cluster with Argo CD already installed, you can extend it with Codefresh’s GitOps capabilities. This installation option for the GitOps Runtime requires additional configuration to prevent naming and tracking conflicts across resources both to the Community Argo CD instance and to the Argo CD instance deployed by Codefresh.
Choose the installation option that best aligns with your specific requirements and current environment setup.
GitOps Runtime installation
-
First-time GitOps Runtime installation If this is your first time installing a GitOps Runtime in your Codefresh account, follow these steps:
- Complete pre-requisites: Before starting the installation, complete pre-requisites.
- System requirements: Check the minimum system requirements to ensure smooth installation.
- Step-by-step installation: Follow our step-by-step guide to install the Hybrid GitOps Runtime from the Codefresh UI.
-
Additional GitOps Runtime installation
If you have already installed a GitOps Runtime in your account and want to install additional Runtimes on different clusters within the same account, you can continue with a simplified installation from the Codefresh UI, or use Terraform.
When installing additional GitOps Runtimes, Git provider, Shared Configuration Repository, and the repository for the Helm chart, for example, are not required, as they have been already set up for your account.
ArgoCD password WARNING
Avoid changing the Argo CD password using the argocd-initial-admin-secret via the Argo CD UI. Doing so can cause system instability and disrupt the Codefresh platform.
Terminology clarifications:
In the documentation, Hybrid GitOps Runtimes are also referred to as GitOps Runtimes.
Preparing for Hybrid GitOps Runtime installation
Whether you are installing the GitOps Runtime on a cluster with or without Community Argo CD, you have to complete the prerequisites to ensure a smooth installation.
| Prerequisite | GitOps Runtime only | GitOps Runtime with Community Argo CD |
|---|---|---|
| Argo Project components | ✅ | N/A |
| SealedSecrets controller | ✅ | N/A |
| Argo Project CRDs(Custom Resource Definitions) | ✅ | ✅ |
| Argo Rollout CRDs(Custom Resource Definitions) | ✅ | ✅ |
| Align Argo CD chart’s minor versions | N/A | ✅ |
| Set Community Argo CD resource tracking to `label | N/A | ✅ |
GitOps Runtime only: Argo Project components
When installing only the GitOps Runtime on the cluster, the cluster should not have any Argo Project components: Argo Rollouts, Argo CD, Argo Events, and Argo Workflows.
GitOps Runtime only: SealedSecrets controller
When installing only the GitOps Runtime on the cluster, the cluster should not have SealedSecret controller components.
GitOps Runtime only/GitOps Runtime with Argo CD: Argo Project CRDs
If you already have Argo Project CRDs on your cluster, Codefresh recommends adopting the CRDs to switch ownership for them to the GitOps Runtime, or handling the CRDs outside the chart.
Allowing the GitOps Runtime to manage the CRDs also ensures that the CRDs are automatically upgraded whenever the Runtime is upgraded.
(Recommended) Adopt all Argo Project CRDs
Adopting all CRDs switches ownership to the Hybrid GitOps Runtime, allowing them to be managed by the GitOps Runtime chart.
Run this script before installation:
curl https://raw.githubusercontent.com/codefresh-io/gitops-runtime-helm/main/scripts/adopt-crds.sh | bash -s <runtime-helm-release name> <runtime-namespace>
Handle Argo Project CRDs outside of the chart
Disable CRD installation under the relevant section for each of the Argo Projects in the Helm chart:
--set <argo-project>.crds.install=false
where:
<argo-project> is the Argo Project component: argo-cd, argo-workflows, argo-rollouts and argo-events.
See Argo’s readme on Helm charts.
GitOps Runtime only/GitOps Runtime with Argo CD: Argo Rollout CRDs
You can also adopt only those CRDs that apply to Argo Rollouts. Adopting Argo Rollouts CRDs also switches ownership of the Rollout CRDs to the GitOps Runtime, and ensures that there is only one active Argo Rollouts controller active on the Runtime cluster.
See Argo’s readme on Helm charts.
GitOps only/GitOps with Argo CD: Argo Rollout CRDs
You can also adopt only those CRDs that apply to Argo Rollouts. Adopting Argo Rollouts CRDs also switches ownership of the Rollout CRDs to the GitOps Runtime, and ensures that there is only one active Argo Rollouts controller active on the Runtime cluster.
NOTE
If you already adopted all Argo Project CRDs, you can skip this part.
Run this script before installation:
#!/bin/sh
RELEASE=<runtime-helm-release-name>
NAMESPACE=<runtime-namespace>
kubectl label --overwrite crds $(kubectl get crd | grep argoproj.io | awk '{print $1}' | xargs) app.kubernetes.io/managed-by=Helm
kubectl annotate --overwrite crds $(kubectl get crd | grep argoproj.io | awk '{print $1}' | xargs) meta.helm.sh/release-name=$RELEASE
kubectl annotate --overwrite crds $(kubectl get crd | grep argoproj.io | awk '{print $1}' | xargs) meta.helm.sh/release-namespace=$NAMESPACE
GitOps Runtime with Argo CD: Align Argo CD chart’s minor versions
To avoid potentially incompatible changes or mismatches, ensure that the Community Argo CD instance uses the same upstream version of Argo CD used by Codefresh.
If the chart’s minor appversion is lower than the version used by Codefresh, you will need to upgrade to the required version. For higher minor appversions that are not available in Codefresh forks, please contact Codefresh Support for assistance.
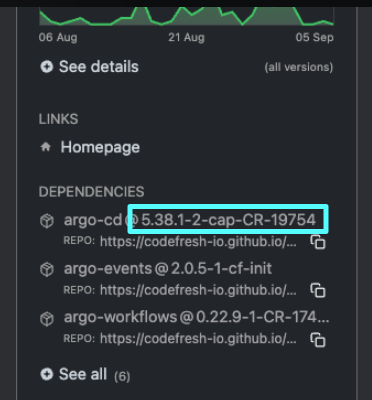
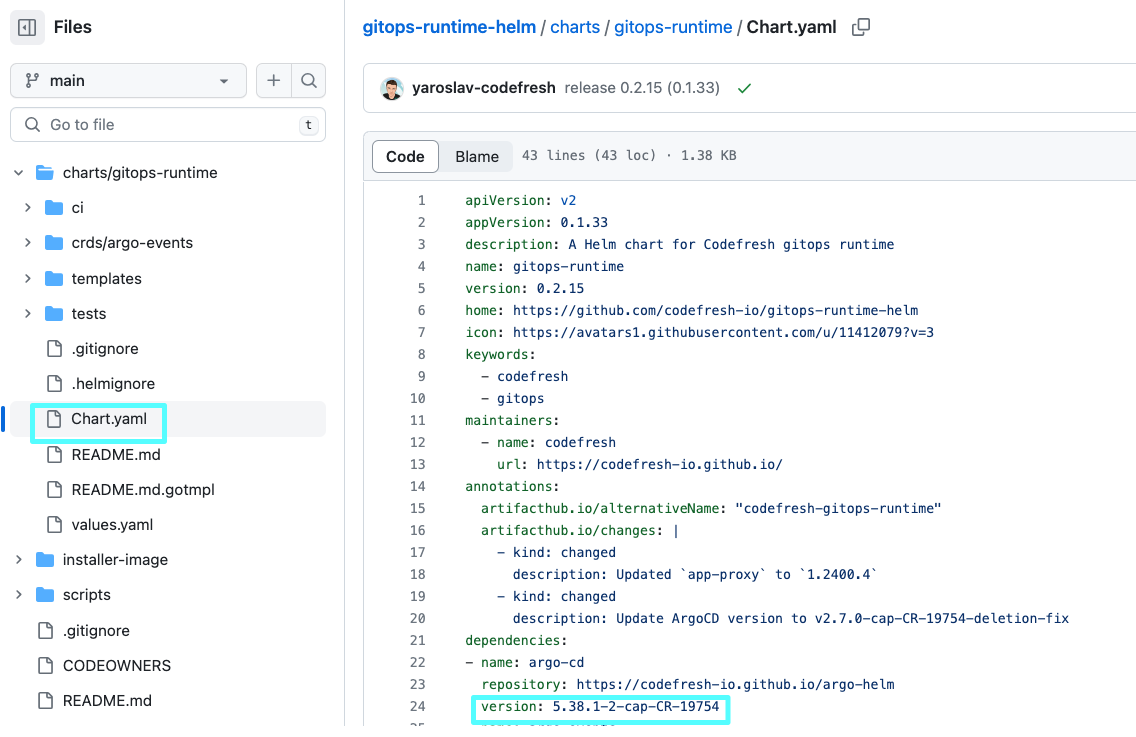
- Get the Argo CD chart version used by Codefresh from the Dependencies either in ArtifactHub or from the GitOps Runtime’s
Chart.yamlin Git:
- Go to
https://github.com/codefresh-io/argo-helm/blob/argo-cd-<dependency-chart-version>/charts/argo-cd/Chart.yaml
where:
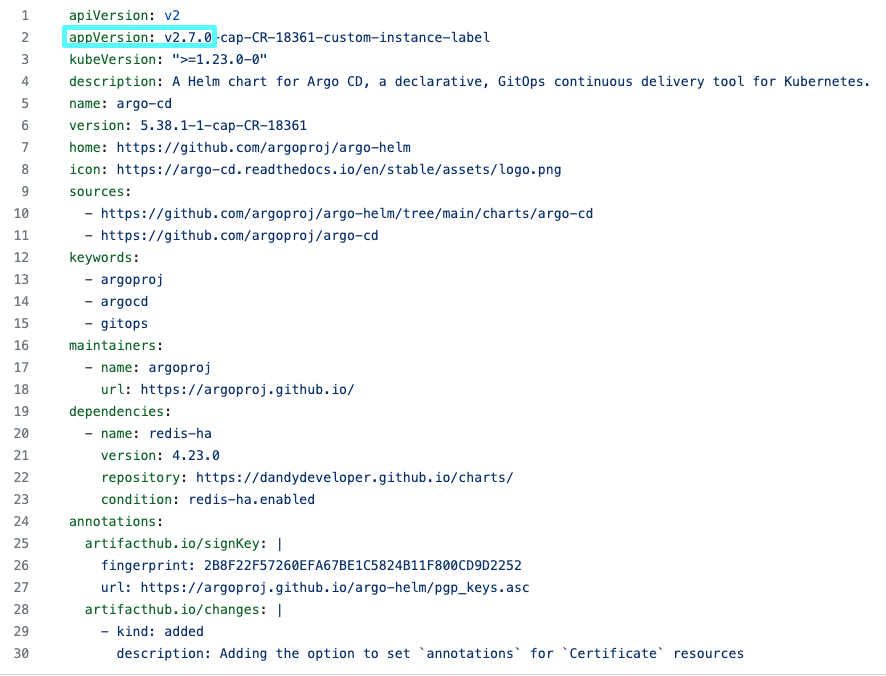
<dependency-chart-version>is the Codefresh Argo CD chart version you retrieved in step 1, for example,5.38.1-1-cap-CR-18361. - Check the
appVersionas in the example below.
- If the minor appversion you have differs from that used by Codefresh, do one of the following:
- Lower version: Upgrade to the required minor appversion.
- Higher version: If not available in Codefresh forks, please contact Codefresh Support.
GitOps with Argo CD: Set Community Argo CD resource tracking to label
When you install GitOps on a cluster with an existing Community Argo CD installation, ensure that the Community Argo CD is set to track resources using the default label method. If both Argo CD instances use the same tracking method, it can result in conflicts when tracking applications with the same name, or when tracking the same resource.
- In the Argo CD namespace, make sure
argocd-cm.application.resourceTrackingMethodis either not defined, in which case it defaults tolabel, or if defined, is set tolabel.
Install first GitOps Runtime in account
If this is the first GitOps Runtime installation in your Codefresh account, install the Runtime from the Codefresh UI, following the step-by-step installation procedure.
The Codefresh values.yaml located here, contains all the arguments you can configure, including optional ones.
Before you begin
- Make sure you meet the minimum requirements for installation
- Verify that you complete all the prerequisites
- Git provider requirements:
- Git Runtime token with the required scopes which you need to supply as part of the Helm install command
- Server URLs for on-premises Git providers
- For ingress-based runtimes only, verify that these ingress controllers are configured correctly:
Step 1: Select Hybrid Runtime install option
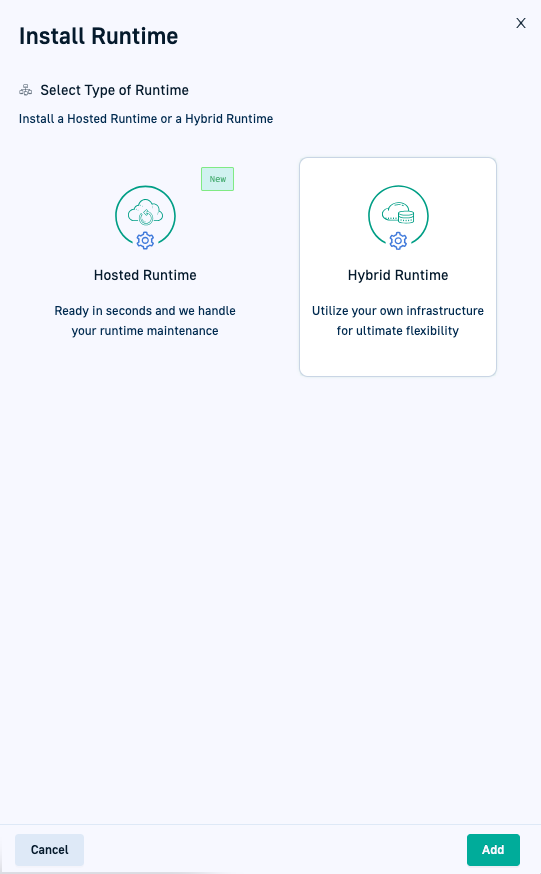
- In the Welcome page, select + Install Runtime.
- Select Hybrid Runtime.
- Continue with Step 2: Set up GitOps Git provider.
Step 2: Set up GitOps Git provider
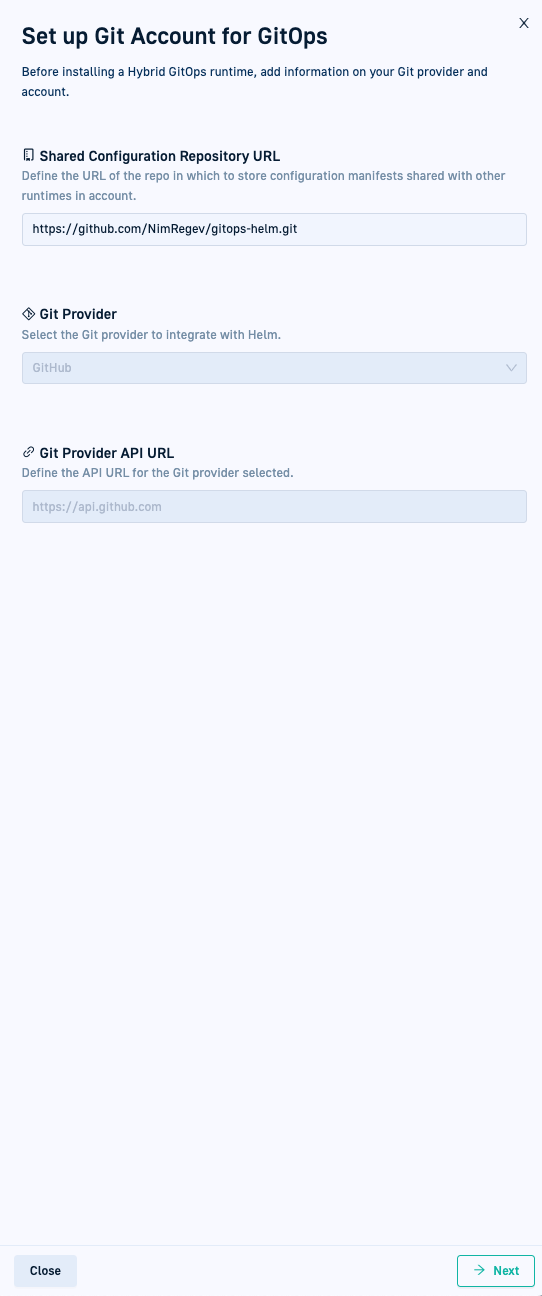
As a one-time action, define the Shared Configuration Repository and the Git provider to associate with your account.
The Git provider you select for the first GitOps Runtime in your account is used for all the other Runtimes installed in the same account.
Shared Configuration Repository
The Shared Configuration Repository is a Git repository with configuration manifests shared between all the Hybrid GitOps Runtimes within the same account. Codefresh identifies the Git provider from the URL of the Shared Configuration Repo, and for cloud providers, automatically populates the Git Provider and the API URL fields.
Git provider
On-premises Git providers require you to define the API URL:
- GitHub Enterprise:
https://<server-url>/api/v3 - GitLab Server:
<server-url>/api/v4 - Bitbucket Server:
<server-url>/rest/api/1.0
How to
- Define the URL of the Shared Configuration Repository.
- If required, select the Git provider from the list.
- If required, define the API URL for the Git provider you selected.
- Click Next.
- Continue with Step 3: Install Hybrid Runtime.
Step 3: Install Hybrid GitOps Runtime
Install the Hybrid GitOps Runtime through the Helm chart. The Codefresh values.yaml is located here.
TIP
Before initiating the installation, Codefresh automatically validates the values.yaml file to verify that the supplied values are correct.
If the Helm installation is terminated with the error message: Job has reached the specified backoff limit, get more detailed information on the reason for the validation failure with:
kubectl logs jobs/validate-values -n ${NAMESPACE}, replacing {NAMESPACE} with the namespace of the Hybrid GitOps Runtime.
Runtime Name
If you define a custom name for the Hybrid GitOps Runtime, it must start with a lower-case character, and can include up to 62 lower-case characters and numbers.
Namespace
The Namespace must conform to the naming conventions for Kubernetes objects.
Access modes
You can define one of three different access modes:
- Tunnel-based, the default mode, is automatically enabled when the other access modes are not defined in the installation command.
- Ingress-based, uses an ingress controller, which, depending on the type of ingress controller, may need to be configured both before and after installation. See Ingress controller configuration in this article.
- Service-mesh-based, which requires explicitly disabling the tunnel- and ingress-based modes in the installation command. The service mesh may also need to be configured before and after installation. See Ingress controller configuration in this article.
GitOps with Argo CD and Argo Rollouts
-
fullnameOverrideconfiguration for resource conflicts
Installing GitOps Runtime on the same cluster as Argo CD can cause conflicts when resources in both Community and Codefresh’s Argo CD instances have the same name or attempt to control the same objects. CustomizingfullnameOverridevalues for Argo CD, and if installed, Argo Rollouts, in the GitOps Runtime’svaluesfile prevents these conflicts. -
Resource tracking with
annotation
Installing GitOps Runtime on the same cluster as Argo CD require that each Argo CD instance uses different methods to track resources. Using the same tracking method can result in conflicts when both instances have applications with the same names or when tracking the same resource. Setting the GitOps Runtime’s Argo CD resource tracking toannotationprevents such conflicts.
How to
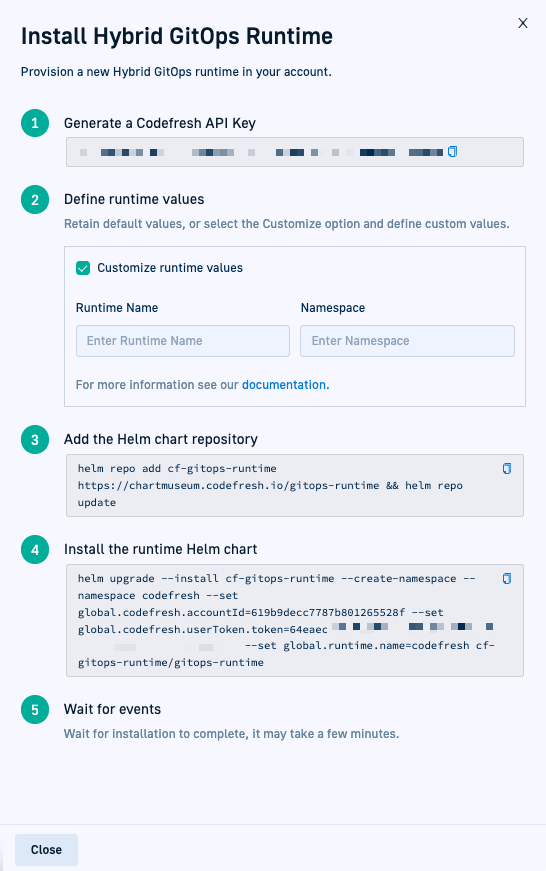
- To generate your Codefresh API key, click Generate.
- If needed, select Customize runtime values, and define the Runtime Name and Namespace.
The default names are
codefreshfor both. - Copy and run the command to install the runtime Helm chart:
The commands differ depending on the access mode. Ingress-based or service-mesh-based access modes for the Runtime require additional flags.
Unless otherwise indicated, values are automatically populated by Codefresh. If you’re using a terminal, remember to copy the values from the UI beforehand.
Tunnel-based install chart command:
helm upgrade --install <helm-release-name> \
  --create-namespace \
  --namespace <namespace> \
  --set global.codefresh.accountId=<codefresh-account-id> \
  --set global.codefresh.userToken.token=<codefresh-api-key> \
  --set global.runtime.name=<runtime-name> \
  oci://quay.io/codefresh/gitops-runtime \
  --set argo-cd.fullnameOverride=codefresh-argo-cd \
  --set argo-rollouts.fullnameOverride=codefresh-argo-cd \
  --set argo-cd.configs.cm.application.resourceTrackingMethod=annotation \
  --wait
Ingress-based install chart command:
helm upgrade --install <helm-release-name> \
  --create-namespace \
  --namespace <namespace> \
  --set global.codefresh.userToken.token=<codefresh-api-key> \
  --set global.runtime.name=<runtime-name> \
  --set global.runtime.ingress.enabled=true \
  --set "global.runtime.ingress.hosts[0]"=<ingress-host> \
  --set global.runtime.ingress.className=<ingress-class> \
  --set argo-cd.fullnameOverride=codefresh-argo-cd \
  --set argo-rollouts.fullnameOverride=codefresh-argo-cd \
  --set argo-cd.configs.cm.application.resourceTrackingMethod=annotation \
  oci://quay.io/codefresh/gitops-runtime \
  --wait
Service-mesh-based install command (without ingress and tunnel):
helm upgrade --install <helm-release-name> \
  --create-namespace \
  --namespace <namespace> \
  --set global.codefresh.userToken.token=<codefresh-api-key> \
  --set global.runtime.name=<runtime-name> \
  --set global.runtime.ingressUrl=<ingress-url> \
  --set global.runtime.ingress.enabled=false \
  --set tunnel-client.enabled=false \
  --set argo-cd.fullnameOverride=codefresh-argo-cd \
  --set argo-rollouts.fullnameOverride=codefresh-argo-cd \
  --set argo-cd.configs.cm.application.resourceTrackingMethod=annotation \
  oci://quay.io/codefresh/gitops-runtime \
  --wait
where:
-
<helm-release-name>is the name of the Helm release, and is eithercf-gitops-runtimewhich is the default, or the release name you define.<namespace>is the namespace in which to install the Hybrid GitOps runtime, and is eithercodefreshwhich is the default, or the custom name you define.<codefresh-account-id>is mandatory only for tunnel-based Hybrid GitOps Runtimes , which is also the default access mode. Automatically populated by Codefresh in the installation command.<codefresh-api-key>is the API key, either an existing one or a new API key you generated. When generated, it is automatically populated in the command.<runtime-name>is the name of the GitOps Runtime, and is eithercodefreshwhich is the default, or the custom name you define.gitops-runtimeis the chart name defined by Codefresh, and cannot be changed.- GitOps with Argo CD installation:
argo-cd.fullnameOverride=codefresh-argo-cdis mandatory when installing GitOps with Argo CD to avoid conflicts at the cluster-level for resources in both the Community Argo CD and GitOps Runtime’s Argo CD.argo-rollouts.fullnameOverride=codefresh-argo-rolloutsis mandatory when installing GitOps with Argo CD and you have Argo Rollouts in your cluster to avoid conflicts.argo-cd.configs.cm.application.resourceTrackingMethod=annotationis mandatory installing GitOps with Argo CD to avoid conflicts when tracking resources with the same application names or when tracking the same resource in both the Community Argo CD and GitOps Runtime’s Argo CD.
- Ingress-based Runtimes:
global.runtime.ingress.enabled=trueis mandatory for ingress-based Hybrid GitOps Runtimes, and indicates that the runtime is ingress-based.<ingress-host>is mandatory for ingress-based Hybrid GitOps Runtimes, and is the IP address or host name of the ingress controller component.<ingress-class>is mandatory for ingress-based Hybrid GitOps Runtimes, and is the ingress class of the ingress controller. For example,nginxfor the NGINX ingress controller.
- Service-mesh-based Runtimes:
global.runtime.ingressUrl=<ingress-url>is the ingress URL that is the entry point to the cluster.global.runtime.ingress.enabled=falsedisables the ingress-based access mode.tunnel-client.enabled=falsedisables the tunnel-based access mode.
--waitis optional, and when defined, waits until all the pods are up and running for the deployment.
- Wait for a few minutes, and then click Close.
You are taken to the List View for GitOps Runtimes where:
- The Hybrid GitOps Runtime you added is prefixed with a green dot indicating that it is online.
- The Type column for the Runtime displays Helm.
- The Sync Status column displays Complete Installation, indicating that there are pending steps to complete the installation.
- Drilling down into the Runtime shows empty tabs for Runtime Components, Git Sources, and Managed Clusters.
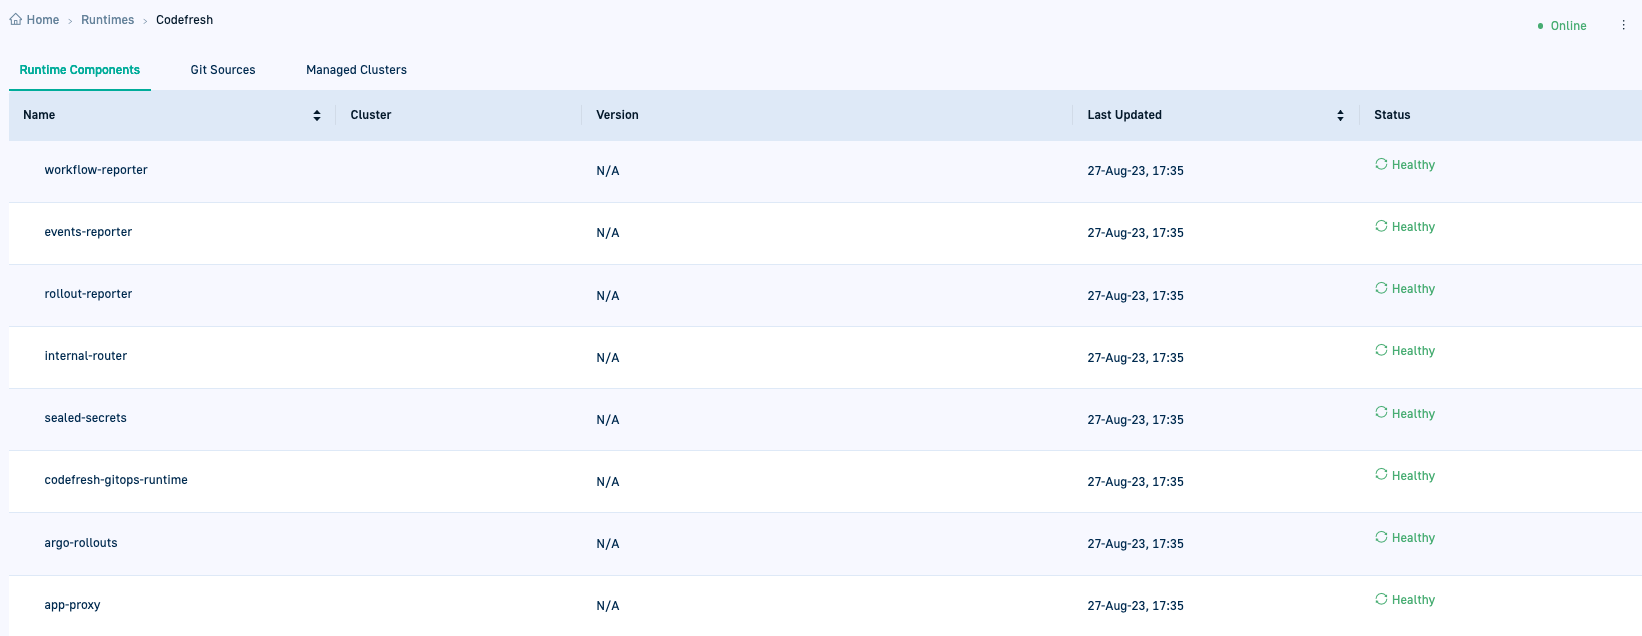
The Runtime Components are populated only when the GitOps Runtime is configured as an Argo Application, described later on in the installation process.
- Continue with Step 4: Configure Git credentials for runtime.
Step 4: Configure Git credentials for Hybrid GitOps Runtime
Configure Git credentials to authorize access to and ensure proper functioning of the GitOps Runtime.
This is the first of the three steps needed to complete installing Hybrid GitOps Runtimes, the others being to add a Git user token and configure the Runtime as an Argo Application, described in the steps that follow this one.
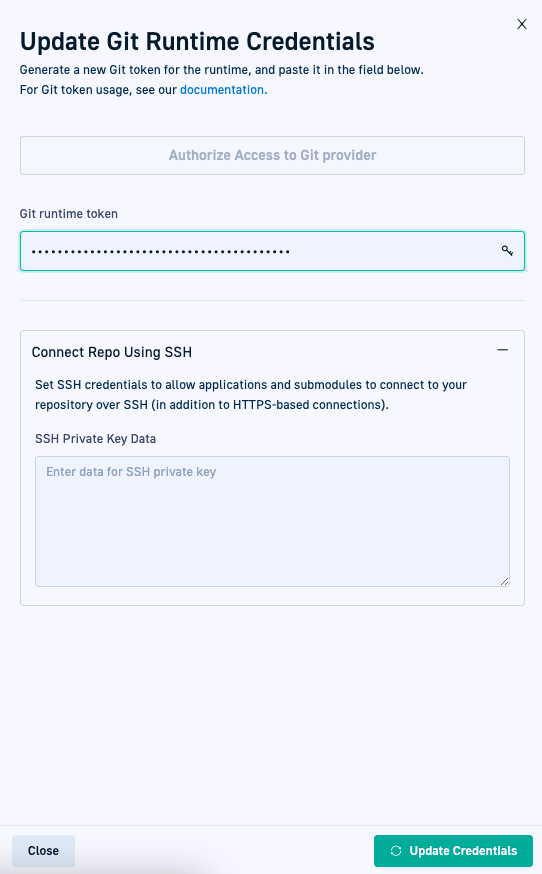
Git credentials include authorizing access to Git repositories through OAuth2 or a Git Runtime token, and optionally configuring SSH access to the Git installation repo for the Runtime.
Git OAuth2 authorization
OAuth2 authorization is possible if your admin has registered an OAuth Application for Codefresh. See OAuth2 setup for GitOps.
Git access token authorization
Git access token authentication requires you to generate an access token in your Git provider account for the GitOps Runtime with the required scopes. For detailed information on Git Runtime token, including using tokens with custom scopes, review GitOps Runtime token scopes.
SSH access to Git
By default, Git repositories use the HTTPS protocol. You can also use SSH to connect Git repositories by entering the SSH private key. When SSH is configured for a GitOps Runtime, on creating/editing Git-Source applications, you can select HTTPS OR SSH as the protocol to connect to the Git repository. See Repository URL in Application Source definitions.
For more information on generating SSH private keys, see the official documentation:
Before you begin
- To authenticate through a Git Runtime access token, make sure your token is valid and has the required scopes and is set up as required
- To use SSH, copy the SSH private key for your Git provider
How to
- In the Sync Status column for the Runtime you just installed, click Complete Installation. Codefresh displays the steps needed to complete the installation.
- Do one of the following:
- If your admin has set up OAuth access, click Authorize Access to Git Provider. Go to step 3.
- Alternatively, authenticate with an access token from your Git provider. Go to step 4.
- For OAuth2 authorization:
NOTE
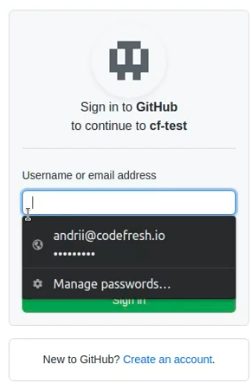
If the application is not registered and you get an error, contact your admin for help.- Enter your credentials, and select Sign In.
- If required, as for example with two-factor authentication, complete the verification.
- For Git token authentication, in the Git Runtime Token field, paste the Git Runtime token you generated.
- Optional. To configure SSH access to Git, expand Connect Repo using SSH, and then paste the raw SSH private key into the field.
- Click Update Credentials. Codefresh displays a message that the Git Runtime credentials have been updated.
- Continue with Step 5: Add Git user token.
Step 5: Add Git user token
Add a Git user token, as a personal access token unique to every user. The permissions for the Git user token are different from those of the Git Runtime token. Verify that you have an access token from your Git provider with the correct scopes.
This is the second of three steps needed to complete installing Hybrid GitOps Runtimes, the others being to add a Git Runtime token (previous step) and configure the Runtime as an Argo Application (following step).
TIP
If you already have added a Git user token, you can skip this step.
- Click Git user token to add your personal access token to authorize actions to Git repositories.
- Continue with Step 6: (Optional) Configure Hybrid GitOps Runtime as Argo Application.
Step 6: (Optional) Configure Hybrid GitOps Runtime as Argo Application
Configure the Hybrid GitOps Runtime as an Argo Application as the final step in the installation process. By doing so, you can view the Runtime components, monitor health and sync statuses, and ensure that GitOps is the single source of truth for the Runtime.
NOTE
You cannot configure the Runtime as an Argo Application if you have not configured Git credentials for the Runtime, as described in the previous step.
- Go back to the List view.
- Click Configure as Argo Application. Codefresh takes care of the configuration for you. If you drill down into the Runtime and click Runtime Components, you’ll see the list of components with their Health status.
Step 7: (Optional) GitOps with Community Argo CD: Remove Rollouts controller deployment
For GitOps with Argo CD, if you have Argo Rollouts also installed, after confirming successful installation, remove the duplicate Argo Rollouts controller deployment to avoid having two controllers in the cluster.
IMPORTANT
Make sure to remove only the deployment and not the CRDs. Removing the CRDs also removes Rollout objects resulting in downtime for workloads.
- Remove the duplicate Argo Rollouts controller:
kubectl delete deployment <argo-rollouts-controller-name> -n <argo-rollouts-controller-namespace> - Continue with Step 8: (Optional) Create a Git Source.
Step 8: (Optional) Create a Git Source
Create a Git Source for the Runtime. A Git Source is a Git repository managed by Codefresh as an Argo CD application.
You can always create Git Sources after installation whenever you need to in the Codefresh UI.
- Optional. Create a Git Source.
- Continue with Step 9: (Optional) Configure ingress-controllers.
Step 9: (Optional) Configure ingress-controllers
Required only for ALB AWS and NGINX Enterprise ingress-controllers, and Istio service meshes.
- Complete configuring these ingress controllers:
That’s it! You have successfully completed installing a Hybrid GitOps Runtime with Helm. View the Runtime in the Runtimes page.
Depending on your configuration:
- If you have private registries, you need to override specific image values, and if your Git servers are on-premises, you need to add custom repository certificates. See Optional GitOps Runtime configuration in this article.
- If you installed the GitOps Runtime on a cluster alongside Community Argo CD, you can migrate Community Argo CD Applications to Codefresh Argo CD applications.
You can now add external clusters, and create and deploy Argo CD applications.
Install additional GitOps Runtimes in account
Install additional Hybrid GitOps Runtimes on different clusters within the same account.
Copy the Helm install command from the Codefresh UI, and run the command. Codefresh validates every GitOps Runtime you install, and guides you through the tasks to complete the installation to ensure a fully functional GitOps Runtime.
The Codefresh values.yaml located here, contains all the arguments you can configure, including optional ones.
Step 1: Copy & run Helm install command
Git provider and Shared Configuration Repository
The Git provider and Shared Configuration Repository is configured once per account, and are not required for additional installations in the same account.
Shared Configuration Repository and Git provider
The Shared Configuration Repository and Git provider are configured once per account, and not required for additional installations.
Access mode
You can define the tunnel/ingress/service-mesh-based access mode for the additional GitOps Runtimes you install. The command in the How To below is valid for the tunnel-based access mode. For ingress-based or service-mesh-based access modes, add the required arguments and values, as described in the step-by-step section, Step 3: Install Hybrid GitOps Runtime.
Runtime name
The name of the Runtime must be unique in the same account.
How to
- In the Codefresh UI, on the toolbar, click the Settings icon, and from Runtimes in the sidebar, select GitOps Runtimes.
- Click + Add Runtimes, and then select Hybrid Runtimes.
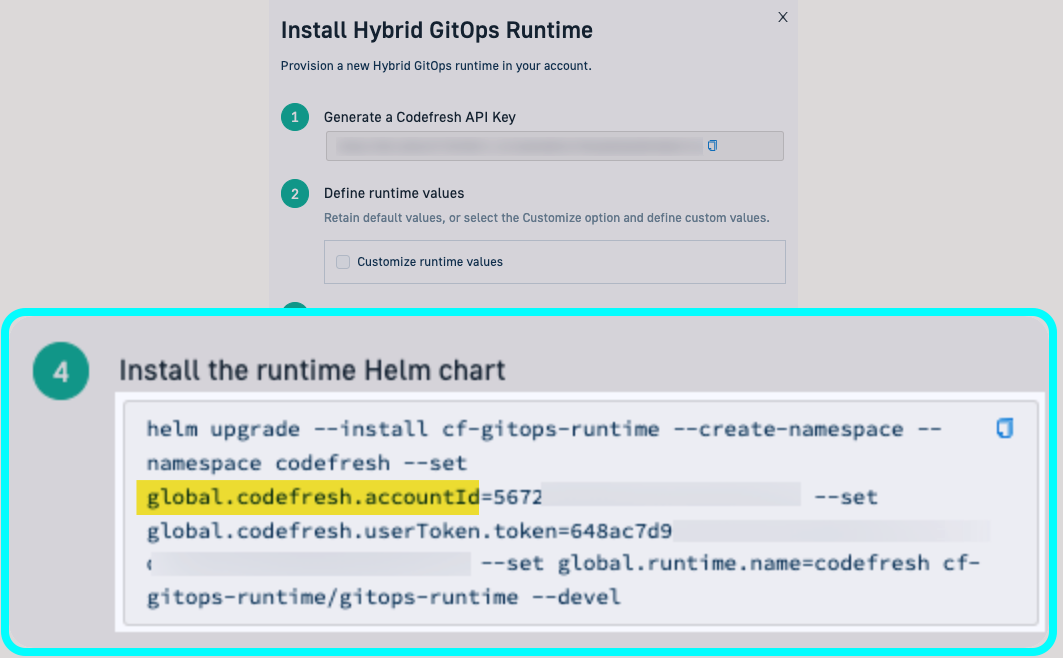
- Copy the command in Step 4 and define the values that are not automatically populated.
where:
<helm-release-name>is the name of the Helm release, and you can either retain the defaultcf-gitops-runtime, or define a custom release name.<namespace>is the namespace in which to install the Hybrid GitOps runtime, and is eithercodefreshwhich is the default, or any custom name that you define.<codefresh-account-id>is mandatory only for tunnel-based Hybrid GitOps Runtimes which is also the default access mode. Automatically populated by Codefresh in the command if other access modes are not explicitly defined.<codefresh-token>is the API key, either an existing one or the new API key you generated. When generated, it is automatically populated in the command.<runtime-name>is the name of the Runtime, and must be unique in your account.<helm-repo-chart-name>is the name of the repo in which to add the Helm chart, and is eithercf-gitops-runtimewhich is the default, or any custom name you define.--waitwaits until all the pods are up and running for the deployment.
- Continue with Step 2: Complete GitOps Runtime installation.
Step 2: Complete GitOps Runtime installation
Complete Runtime installation by completing the required configuration:
- Git credentials to authorize access to and ensure proper functioning of the GitOps Runtime
- Git user token to authorize actions on your Git repositories
- Convert Runtime to an Argo Application
Git Runtime token
You can use the same Git Runtime token you used for the first Runtime.
Git user token
The Git user token is a personal access token unique to every user. The permissions for the Git user token are different from those of the Git Runtime token.
Verify that you have an access token from your Git provider with the correct scopes.
Configure as Argo CD application
Configuring the Runtime an an Argo CD application to view the Runtime components, monitor health and sync statuses, and ensure that GitOps is the single source of truth for the Runtime.
How to
- In the Codefresh UI, go to the Runtimes page. Codefresh displays the steps needed to complete the installation. You may see a message that the Runtime is missing a Git user token. You can ignore this message and continue to complete the installation.
- Click Git Runtime token to configure Git credentials for the GitOps Runtime:
- For OAuth authorization:
- Click Authorize Access to Git Provider.
- Enter your credentials, and select Sign In.
- If required, as for example with two-factor authentication, complete the verification.
- For Git token authentication, in the Git Runtime Token field, paste the Git Runtime token you generated.
- Optional. To configure SSH access to Git, expand Connect Repo using SSH, and then paste the raw SSH private key into the field.
- For OAuth authorization:
- Click Git user token to add your personal access token to authorize actions to Git repositories.
- In Configure as Argo Application, click Configure. Codefresh takes care of the configuration for you.
- Once complete, drill down into the Runtime and click the Runtime Components tab. The tab is populated with the list of components including their Health status.
- For GitOps with Community Argo CD, after confirming successful installation, remove the duplicate Argo Rollouts controller
deploymentto avoid having two controllers in the cluster.
IMPORTANT
Make sure to remove only the deployment and not the CRDs. Removing the CRDs also removes Rollout objects resulting in downtime for workloads.
kubectl delete deployment <argo-rollouts-controller-name> -n <argo-rollouts-controller-namespace>
What to do next
Depending on your configuration:
- If you have private registries, you need to override specific image values, and if your Git servers are on-premises, you need to add custom repository certificates. See Optional GitOps Runtime configuration in this article.
- If you installed the GitOps Runtime on a cluster alongside Community Argo CD, you can migrate Community Argo CD Applications to Codefresh Argo CD applications.
You can now add Git Sources, external clusters, create and deploy Argo CD applications.
Install GitOps Runtime via Terraform
You can also use Terraform to install a GitOps Runtime with the Helm provider.
Here is an example:
resource "helm_release" "my_gitops_runtime" {
  name = "my-codefresh-runtime"

  repository       = "oci://quay.io/codefresh"
  chart            = "gitops-runtime"
  namespace        = "my-codefresh-runtime"
  version          = "0.2.14"
  create_namespace = true
  set {
    name  = "global.codefresh.accountId"
    value = var.cf_account_id
  }
  set {
    name  = "global.codefresh.userToken.token"
    value = var.cf_token
  }
  set {
    name  = "global.runtime.name"
    value = "from-terraform"
  }
}
Feel free to user a different chart version and a unique name for the Runtime. You can get the values for both the Codefresh API token and account ID from the Codefresh UI as explained in the previous section.
The example is valid for the tunnel-based access mode. For ingress-based or service-mesh-based access modes, add the required arguments and values, as described in Step 3: Install Hybrid GitOps Runtime.
Depending on your configuration:
- If you have private registries, you need to override specific image values, and if your Git servers are on-premises, you need to add custom repository certificates. See Optional GitOps Runtime configuration in this article.
- If you installed the GitOps Runtime on a cluster with Argo CD, you can migrate Community Argo CD Applications to GitOps applications.
By default, the GitOps Runtime can deploy to the cluster it is installed on. You can add Git Sources, use Terraform to connect external clusters, and create and deploy GitOps applications.
Optional GitOps Runtime configuration
Image overrides for private registries
If you use private registries, you must override specific image values for the different subcharts and container images.
Our utility helps override image values for GitOps Runtimes by creating values files that match the structure of the subcharts, allowing you to easily replace image registries. During chart installation, you can provide these values files to override the images, as needed.
For more details, see ArtifactHub.
Custom repository certificates
Repository certificates are required to authenticate users to on-premises Git servers.
If your Git servers are on-premises, add the repository certificates to your Codefresh values file, in .values.argo-cd. These values are used by the Argo CD that Codefresh deploys. For details on adding repository certificates, see this section.
global:
  codefresh:
    tls:
      caCerts:
        # optional - use an existing secret that contains the cert
        # secretKeyRef:
        #   name: my-certificate-secret
        #   key: ca-bundle.crt
        # or create "codefresh-tls-certs" secret
        secret:
          create: true
          content: |
            -----BEGIN CERTIFICATE-----
            ...
            -----END CERTIFICATE-----
Migrate Argo CD Applications to Codefresh GitOps Runtime
The final task depending on your requirements is to migrate your Argo CD Applications to a Codefresh GitOps Runtime.
Because this allows you to completely and seamlessly manage the applications in Codefresh as GitOps entities.
The process to migrate an Argo CD Application is simple:
- Add a Git Source to the Runtime to which store application manifests
- Make the needed configuration changes in the Argo CD Application
- Commit the application to the Git Source for viewing and management in Codefresh
Step 1: Add a Git Source to GitOps Runtime
After installing the GitOps Runtime successfully, you can add a Git Source to the Runtime and commit your applications to it. A Git Source is a Git repository with an opinionated folder structure managed by Codefresh. Read about Git Sources.
- Add a Git Source to your GitOps Runtime.
Step 2: Modify Argo CD Application
Modify the Argo CD Application’s manifest to remove finalizers, if any, and also remove the Application from the argocd namespace it is assigned to by default.
- Remove
metadata.namespace: argocd. - Remove
metadata.finalizers.
Below is an example of a manifest for an Argo CD Application with finalizers.
apiVersion: argoproj.io/v1alpha1
kind: Application
metadata:
  name: my-sample-app
  namespace: argocd
  finalizers:
    - resources-finalizer.argocd.argoproj.io
spec:
  project: default
  source:
    path: guestbooks/apps
    repoURL: https://github.com/codefresh-codefresh/argocd-example-apps
    targetRevision: personal-eks
  destination:
    namespace: my-app
    server: https://kubernetes.default.svc
  syncPolicy:
    automated:
      prune: false
      selfHeal: false
      allowEmpty: false
    syncOptions:
      - PrunePropagationPolicy=foreground
      - Replace=false
      - PruneLast=false
      - Validate=true
      - CreateNamespace=true
      - ApplyOutOfSyncOnly=false
      - ServerSideApply=false
      - RespectIgnoreDifferences=false
Step 3: Commit Argo CD application to Git Source
As the final step in migrating your Argo CD Application to a Codefresh GitOps Runtime, manually commit the updated Application manifest to the Git Source you created in Step 1.
Once you commit the manifest to the Git Source, it is synced to the Git repo. You can view it in the Codefresh UI, modify definitions, track it through our different dashboards, and in short, manage it as you would any GitOps resource in Codefresh.
- Go to the Git repo where you created the Git Source.
- Add and commit the Argo CD Application manifest to the Git Source.
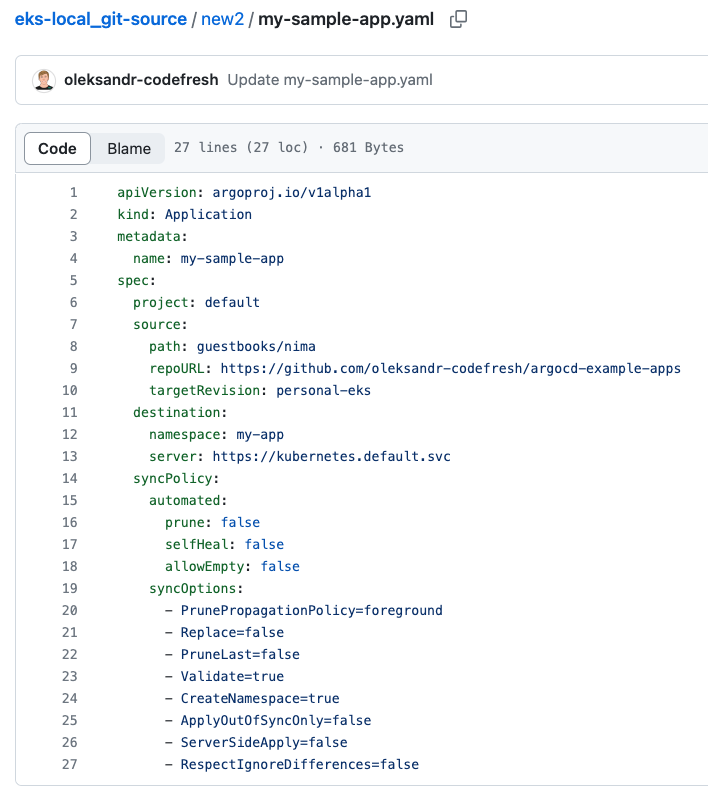
Here’s an example of the
my-sample-appabove committed to a Git Source withoutmetadata.namespace: argocdandmetadata.finalizers.
- In the Codefresh UI, from the sidebar, below Ops, select GitOps Apps. The Applications Dashboard displays the new Git Source application.
- Click the application to drill down to the different tabs. The Configuration tab displays the application’s settings which you can modify and update.
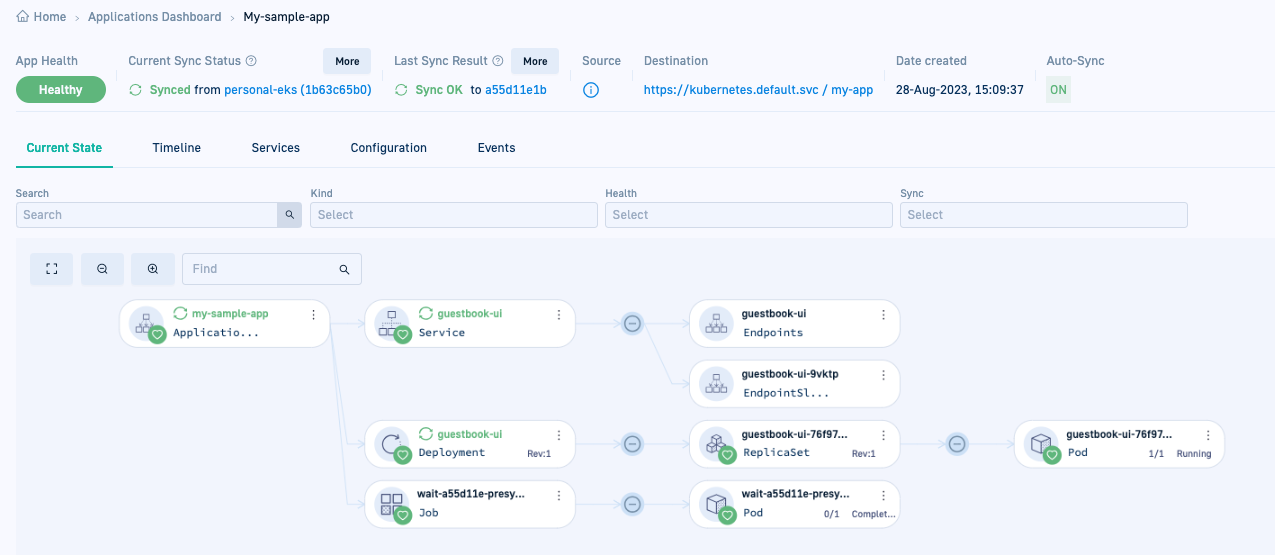
Here’s an example of the Current State tab for
my-sample-app.
You can monitor and manage the application you migrated as any other GitOps application in Codefresh.
Minimum system requirements
| Item | Requirement |
|---|---|
| Kubernetes cluster | Server version 1.21 to 1.27, without Argo Project components. Tip: To check the server version, run: kubectl version --short. |
| Node requirements |
|
| Cluster permissions | Cluster admin permissions |
| Git providers |
|
| Git access tokens | Git runtime token:
|
Git user token:
|
Ingress controller configuration
Codefresh supports both tunnel-based and ingress-based access modes.
Ingress-based access mode requires you to configure an ingress controller before the installation, and pass additional flags such as the ingress host and class in the Helm install command.
See also GitOps Runtime architecture.
Ambassador ingress configuration
For detailed configuration information, see the Ambassador ingress controller documentation.
This section lists the specific configuration requirements for Codefresh to be completed before installing the Hybrid GitOps Runtime.
- Valid external IP address
- Valid TLS certificate
- TCP support
Valid external IP address
Run kubectl get svc -A to get a list of services and verify that the EXTERNAL-IP column for your ingress controller shows a valid hostname.
Valid TLS certificate
For secure installation, the ingress controller must have a valid TLS certificate.
TIP
Use the FQDN (Fully Qualified Domain Name) of the ingress controller for the TLS certificate.
TCP support
Configure the ingress controller to handle TCP requests.
AWS ALB ingress configuration
For detailed configuration information, see the ALB AWS ingress controller documentation.
This table lists the specific configuration requirements for Codefresh.
| What to configure | When to configure |
|---|---|
| Valid external IP address | Before installing Hybrid GitOps Runtime |
| Valid TLS certificate | |
| TCP support | |
| Controller configuration] | |
| Alias DNS record in route53 to load balancer | After installing Hybrid GitOps Runtime |
| (Optional) Git integration registration |
Valid external IP address
Run kubectl get svc -A to get a list of services and verify that the EXTERNAL-IP column for your ingress controller shows a valid hostname.
Valid TLS certificate
For secure runtime installation, the ingress controller must have a valid TLS certificate.
TIP:
Use the FQDN (Fully Qualified Domain Name) of the ingress controller for the TLS certificate.
TCP support
Configure the ingress controller to handle TCP requests.
Controller configuration
In the ingress resource file, verify that spec.controller is configured as ingress.k8s.aws/alb.
apiVersion: networking.k8s.io/v1
kind: IngressClass
metadata:
  name: alb
spec:
  controller: ingress.k8s.aws/alb
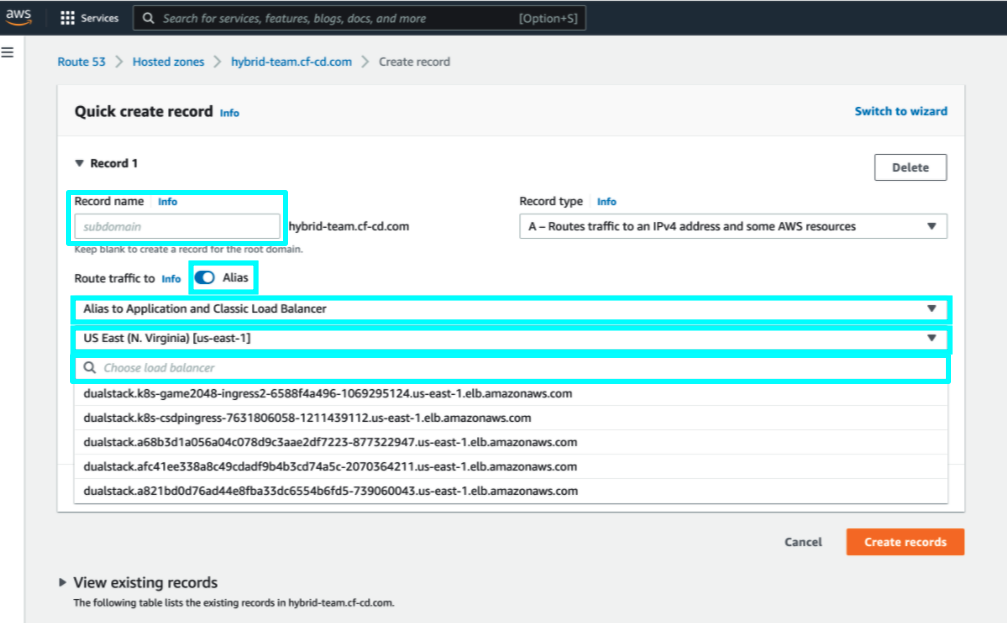
Create an alias to load balancer in route53
IMPORTANT
Configure the alias after installing the Hybrid GitOps Runtime.
- Make sure a DNS record is available in the correct hosted zone.
- After Hybrid GitOps Runtime installation, in Amazon Route 53, create an alias to route traffic to the load balancer that is automatically created during the installation:
- Record name: Enter the same record name used in the installation.
- Toggle Alias to ON.
- From the Route traffic to list, select Alias to Application and Classic Load Balancer.
- From the list of Regions, select the region. For example, US East.
- From the list of load balancers, select the load balancer that was created during installation.
For more information, see Creating records by using the Amazon Route 53 console.
(Optional) Git integration registration
If the installation failed, as can happen if the DNS record was not created within the timeframe, manually create and register Git integrations using these commands:
cf integration git add default --runtime <RUNTIME-NAME> --api-url <API-URL>
cf integration git register default --runtime <RUNTIME-NAME> --token <RUNTIME-AUTHENTICATION-TOKEN>
Istio ingress configuration
For detailed configuration information, see Istio ingress controller documentation.
The table below lists the specific configuration requirements for Codefresh.
| What to configure | When to configure |
|---|---|
| Valid external IP address | Before installing Hybrid GitOps Runtime |
| Valid TLS certificate | |
| TCP support | |
| Cluster routing service | After installing Hybrid GitOps Runtime |
Valid external IP address
Run kubectl get svc -A to get a list of services and verify that the EXTERNAL-IP column for your ingress controller shows a valid hostname.
Valid TLS certificate
For secure runtime installation, the ingress controller must have a valid TLS certificate.
TIP
Use the FQDN (Fully Qualified Domain Name) of the ingress controller for the TLS certificate.
TCP support
Configure the ingress controller to handle TCP requests.
Cluster routing service
IMPORTANT
Configure the cluster routing service after installing the Hybrid GitOps Runtime.
Based on the Hybrid GitOps Runtime version, you need to configure single or multiple VirtualService resources for the app-proxy, webhook, and workflow services.
Runtime version 0.0.543 or higher
Configure a single VirtualService resource to route traffic to the app-proxy, webhook, and workflow services, as in the example below.
apiVersion: networking.istio.io/v1alpha3
kind: VirtualService
metadata:
  namespace: pov-codefresh-istio-runtime # replace with your Hybrid GitOps runtime name
  name: internal-router
spec:
  hosts:
    -  pov-codefresh-istio-runtime.sales-dev.codefresh.io   # replace with your host name
  gateways:
    - istio-system/internal-router  # replace with your gateway name
  http:
    - match:
      - uri:
          prefix: /webhooks
      route:
      - destination:
          host: internal-router
          port:
            number: 80
    - match:
      - uri:
          prefix: /app-proxy
      route:
      - destination:
          host: internal-router
          port:
            number: 80
    - match:
      - uri:
          prefix: /workflows
      route:
      - destination:
          host: internal-router
          port:
            number: 80
Runtime version 0.0.542 or lower
Configure two different VirtualService resources, one to route traffic to the app-proxy, and the second to route traffic to the webhook services, as in the examples below.
VirtualService example for app-proxy:
apiVersion: networking.istio.io/v1alpha3
kind: VirtualService
metadata:
  namespace: test-runtime3 # replace with your Hybrid GitOps runtime name
  name: cap-app-proxy
spec:
  hosts:
    - my.support.cf-cd.com # replace with your host name
  gateways:
    - my-gateway # replace with your host name
  http:
    - match:
      - uri:
          prefix: /app-proxy
      route:
      - destination:
          host: cap-app-proxy
          port:
            number: 3017
VirtualService example for webhook:
Configure a
uri.prefixanddestination.hostfor each event-source if you have more than one.
apiVersion: networking.istio.io/v1alpha3
kind: VirtualService
metadata:
  namespace: test-runtime3 # replace with your Hybrid GitOps runtime name
  name: csdp-default-git-source
spec:
  hosts:
    - my.support.cf-cd.com # replace with your host name
  gateways:
    - my-gateway # replace with your gateway name
  http:
    - match:
      - uri:
          prefix: /webhooks/test-runtime3/push-github # replace `test-runtime3` with your Hybrid GitOps runtime name, and `push-github` with the name of your event source
      route:
      - destination:
          host: push-github-eventsource-svc # replace `push-github' with the name of your event source
          port:
            number: 80
    - match:
      - uri:
          prefix: /webhooks/test-runtime3/cypress-docker-images-push # replace `test-runtime3` with your Hybrid GitOps runtime name, and `cypress-docker-images-push` with the name of your event source
      route:
      - destination:
          host: cypress-docker-images-push-eventsource-svc # replace `cypress-docker-images-push` with the name of your event source
          port:
            number: 80
NGINX Enterprise ingress configuration
For detailed configuration information, see NGINX ingress controller documentation.
The table below lists the specific configuration requirements for Codefresh.
| What to configure | When to configure |
|---|---|
| Verify valid external IP address | Before installing Hybrid GitOps Runtime |
| Valid TLS certificate | |
| TCP support | |
| NGINX Ingress: Enable report status to cluster | |
| NGINX Ingress Operator: Enable report status to cluster | |
| Patch certificate secret | After installing Hybrid GitOps Runtime |
Valid external IP address
Run kubectl get svc -A to get a list of services and verify that the EXTERNAL-IP column for your ingress controller shows a valid hostname.
Valid TLS certificate
For secure runtime installation, the ingress controller must have a valid TLS certificate.
TIP
Use the FQDN (Fully Qualified Domain Name) of the ingress controller for the TLS certificate.
TCP support
Configure the ingress controller to handle TCP requests.
NGINX Ingress: Enable report status to cluster
If the ingress controller is not configured to report its status to the cluster, Argo’s health check reports the health status as “progressing” resulting in a timeout error during installation.
- Pass
--report-ingress-statustodeployment.
spec:
  containers:
    - args:
      - --report-ingress-status
NGINX Ingress Operator: Enable report status to cluster
If the ingress controller is not configured to report its status to the cluster, Argo’s health check reports the health status as “progressing” resulting in a timeout error during installation.
-
Add this to the
Nginxingresscontrollersresource file:... spec: reportIngressStatus: enable: true ... -
Make sure you have a certificate secret in the same namespace as the Hybrid GitOps Runtime. Copy an existing secret if you don’t have one. You will need to add this to the
ingress-masterwhen you have completed runtime installation.
Patch certificate secret
IMPORTANT
The certificate secret must be configured after installing the Hybrid GitOps Runtime.
Patch the certificate secret in spec.tls of the ingress-master resource.
The secret must be in the same namespace as the Hybrid GitOps Runtime.
- Go to the Hybrid GitOps Runtime namespace with the NGINX ingress controller.
-
In
ingress-master, add tospec.tls:tls: - hosts: - <host_name> secretName: <secret_name>
NGINX Community version ingress configuration
Codefresh has been tested with and supports implementations of the major providers. For your convenience, we have provided configuration instructions, both for supported and untested providers in Provider-specific configuration.
This section lists the specific configuration requirements for Codefresh to be completed before installing the Hybrid GitOps Runtime.
- Verify valid external IP address
- Valid TLS certificate
- TCP support
Valid external IP address
Run kubectl get svc -A to get a list of services, and verify that the EXTERNAL-IP column for your ingress controller shows a valid hostname.
Valid TLS certificate
For secure runtime installation, the ingress controller must have a valid TLS certificate.
TIP
Use the FQDN (Fully Qualified Domain Name) of the ingress controller for the TLS certificate.
TCP support
Configure the ingress controller to handle TCP requests.
Here’s an example of TCP configuration for NGINX Community on AWS.
Verify that the ingress-nginx-controller service manifest has either of the following annotations:
service.beta.kubernetes.io/aws-load-balancer-backend-protocol: "tcp"
OR
service.beta.kubernetes.io/aws-load-balancer-type: nlb
Provider-specific configuration
NOTE
The instructions are valid fork8s.io/ingress-nginx, the community version of NGINX.
AWS
- Apply:
kubectl apply -f https://raw.githubusercontent.com/kubernetes/ingress-nginx/controller-v1.1.1/deploy/static/provider/aws/deploy.yaml - Verify a valid external address exists:
kubectl get svc ingress-nginx-controller -n ingress-nginx
Azure (AKS)
- Apply:
kubectl apply -f https://raw.githubusercontent.com/kubernetes/ingress-nginx/controller-v1.1.1/deploy/static/provider/cloud/deploy.yaml - Verify a valid external address exists:
kubectl get svc ingress-nginx-controller -n ingress-nginx
Bare Metal Clusters
- Apply:
kubectl apply -f https://raw.githubusercontent.com/kubernetes/ingress-nginx/controller-v1.1.1/deploy/static/provider/baremetal/deploy.yaml - Verify a valid external address exists:
kubectl get svc ingress-nginx-controller -n ingress-nginx
Digital Ocean
- Apply:
kubectl apply -f https://raw.githubusercontent.com/kubernetes/ingress-nginx/controller-v1.1.1/deploy/static/provider/do/deploy.yaml - Verify a valid external address exists:
kubectl get svc ingress-nginx-controller -n ingress-nginx
Docker Desktop
- Apply:
kubectl apply -f https://raw.githubusercontent.com/kubernetes/ingress-nginx/controller-v1.1.1/deploy/static/provider/cloud/deploy.yaml - Verify a valid external address exists:
kubectl get svc ingress-nginx-controller -n ingress-nginx
Note: By default, Docker Desktop services will provision with localhost as their external address. Triggers in delivery pipelines cannot reach this instance unless they originate from the same machine where Docker Desktop is being used.
Exoscale
- Apply:
kubectl apply -f https://raw.githubusercontent.com/kubernetes/ingress-nginx/main/deploy/static/provider/exoscale/deploy.yaml - Verify a valid external address exists:
kubectl get svc ingress-nginx-controller -n ingress-nginx
Google (GKE)
Add firewall rules
GKE by default limits outbound requests from nodes. For the Hybrid GitOps Runtime to communicate with the control-plane in Codefresh, add a firewall-specific rule.
- Find your cluster's network:
gcloud container clusters describe [CLUSTER_NAME] --format=get"(network)" - Get the Cluster IPV4 CIDR:
gcloud container clusters describe [CLUSTER_NAME] --format=get"(clusterIpv4Cidr)" - Replace the `[CLUSTER_NAME]`, `[NETWORK]`, and `[CLUSTER_IPV4_CIDR]`, with the relevant values:
gcloud compute firewall-rules create "[CLUSTER_NAME]-to-all-vms-on-network"
--network="[NETWORK]" \
--source-ranges="[CLUSTER_IPV4_CIDR]" \
--allow=tcp,udp,icmp,esp,ah,sctp
Use ingress-nginx
- Create a `cluster-admin` role binding:
kubectl create clusterrolebinding cluster-admin-binding \
--clusterrole cluster-admin \
--user $(gcloud config get-value account)
- Apply:
kubectl apply -f https://raw.githubusercontent.com/kubernetes/ingress-nginx/controller-v1.1.1/deploy/static/provider/cloud/deploy.yaml - Verify a valid external address exists:
kubectl get svc ingress-nginx-controller -n ingress-nginx
MicroK8s
- Install using Microk8s addon system:
microk8s enable ingress - Verify a valid external address exists:
kubectl get svc ingress-nginx-controller -n ingress-nginx
MiniKube
- Install using MiniKube addon system:
minikube addons enable ingress - Verify a valid external address exists:
kubectl get svc ingress-nginx-controller -n ingress-nginx
Oracle Cloud Infrastructure
- Apply:
kubectl apply -f https://raw.githubusercontent.com/kubernetes/ingress-nginx/controller-v1.1.1/deploy/static/provider/cloud/deploy.yaml - Verify a valid external address exists:
kubectl get svc ingress-nginx-controller -n ingress-nginx
Scaleway
- Apply:
kubectl apply -f https://raw.githubusercontent.com/kubernetes/ingress-nginx/controller-v1.1.1/deploy/static/provider/scw/deploy.yaml - Verify a valid external address exists:
kubectl get svc ingress-nginx-controller -n ingress-nginx
Traefik ingress configuration
For detailed configuration information, see Traefik ingress controller documentation.
The table below lists the specific configuration requirements for Codefresh.
| What to configure | When to configure |
|---|---|
| Valid external IP address | Before installing Hybrid GitOps Runtime |
| Valid SSL certificate | |
| TCP support | |
| Enable report status to cluster |
Valid external IP address
Run kubectl get svc -A to get a list of services and verify that the EXTERNAL-IP column for your ingress controller shows a valid hostname.
Valid TLS certificate
For secure runtime installation, the ingress controller must have a valid TLS certificate.
TIP
Use the FQDN (Fully Qualified Domain Name) of the ingress controller for the TLS certificate.
TCP support
Configure the ingress controller to handle TCP requests.
Enable report status to cluster
By default, the Traefik ingress controller is not configured to report its status to the cluster. If not configured, Argo’s health check reports the health status as “progressing”, resulting in a timeout error during installation.
To enable reporting its status, add publishedService to providers.kubernetesIngress.ingressEndpoint.
The value must be in the format "<namespace>/<service-name>", where:
<service-name> is the Traefik service from which to copy the status
...
providers:
  kubernetesIngress:
    ingressEndpoint:
      publishedService: "<namespace>/<traefik-service>" # Example, "codefresh/traefik-default"
...
Related articles
Managing and monitoring GitOps Runtimes
Managing Git Sources in GitOps Runtimes
Managing external clusters in GitOps Runtimes
GitOps architecture
