Configure Promotion Workflows
Create, run, and manage Promotion Workflows
For promotions with GitOps, Promotion Workflows define the actions to execute before and after changes are deployed to environments, ensuring that each update meets quality and performance standards. These workflows facilitate pre- and post-promotion testing with validations, performance monitoring, notifications, and more, allowing for precise control when changes are promoted.
In structure and behavior, a Promotion Workflow is essentially an Argo Workflow, classified as a Promotion Workflow. To classify and utilize an Argo Workflow or a Workflow Template as a Promotion Workflow, it must include the annotation attribute metadata.annotations: codefresh.io/workflow-origin: promotion in its manifest.
See Key features of Promotion Workflows and Create Promotion Workflows.
After creating Promotion Workflows, there are two aspects to working with them:
-
Managing Promotion Workflows
Managing Promotion Workflows involves controlling the configuration of the manifest, creating new Promotion Workflows by copying existing ones, and removing workflows that are no longer needed or relevant.
See Managing Promotion Workflows. -
Managing Workflow execution instances
Workflow execution instances represent specific occurrences when a Promotion Workflow is triggered either as part of a Promotion Policy, or run for validation. These instances provide detailed insights into the performance and execution of the specific instance of the Workflow. See Managing Workflow instances.
Key features of Promotion Workflows
Annotation attribute
An Argo Workflow or a Workflow Template is classified as a Promotion Workflow only when the following annotation is present in the workflow manifest:
metadata.annotations: codefresh.io/workflow-origin: promotion
This annotation in the Promotion Workflow’s manifest ensures that:
- The Promotion Workflow is displayed in the Promotion Workflows list and can be managed there
- You can assign the Promotion Workflow to Promotion Policies
- Select it when creating Promotion Flows
See Create Promotion Workflows.
Pre- and Post-Action Workflows
A Promotion Workflow can be executed before or after the Promotion Action as a Pre-Action or a Post-Action Workflow. The Promotion Action is the action that implements the changes to the environment, for example, commit.
Pre-commit run option
Inline validations when creating or editing Promotion Workflows are supplemented by the Run option.
Instead of committing the manifest and detecting errors or failures when the Workflow is activated, the Run option runs the specific Promotion Workflow in the cluster, verifying actions and steps in the workflow, such as sending notifications, running pre-action validations or post-action test. See Validate Promotion Workflow parameters.
Pre- & Post-Action Workflow arguments
Codefresh passes parameters to the Pre-Action and Post-Action Workflows. These arguments allow you to customize Post-Action Workflow execution based on the specific details of the commit.
See Arguments for Pre-Action and Post-Action Workflows.
Promotion Workflow CRDs
Once configured and committed, Workflow settings are saved as a CRD (Custom Resource Definition) within the Shared Configuration Repository in the GitOps Runtime selected as the Configuration Runtime.
The path in the Shared Configuration Repo is <gitops-runtime>/<shared-configuration-repo>/resources/control-planes/promotion-workflows/.
See Shared Configuration Repository and Designating Configuration Runtimes.
Create Promotion Workflows
Create a Promotion Workflow from scratch, use the base Promotion Workflow Template, or use one of the predefined Promotion Workflows in Codefresh.
Whichever method you use to create your Promotion Workflow, make sure you include the annotation in the manifest to classify and use it as a Promotion Workflow.
- In the Codefresh UI, from Promotions in the sidebar, select Promotion Workflows.
- Click Add Promotion Workflow.
- Define the following:
- Name: The name of the Promotion Workflow.
The name must be unique in the cluster, and must match Kubernetes naming conventions. - Description : The intended use of the Promotion Workflow.
The description is added as an annotation to the YAML file. It is also displayed in the Promotion Workflows list in the UI. - Resource Filename: The name of the YAML resource file with the configuration settings for the Promotion Workflow, by default, identical to the Name of the Promotion Workflow. You can change as needed.
- Name: The name of the Promotion Workflow.
- Click Add.
- Select Blank Skeleton File and click Next. The YAML is displayed on the right populated with the settings you defined.
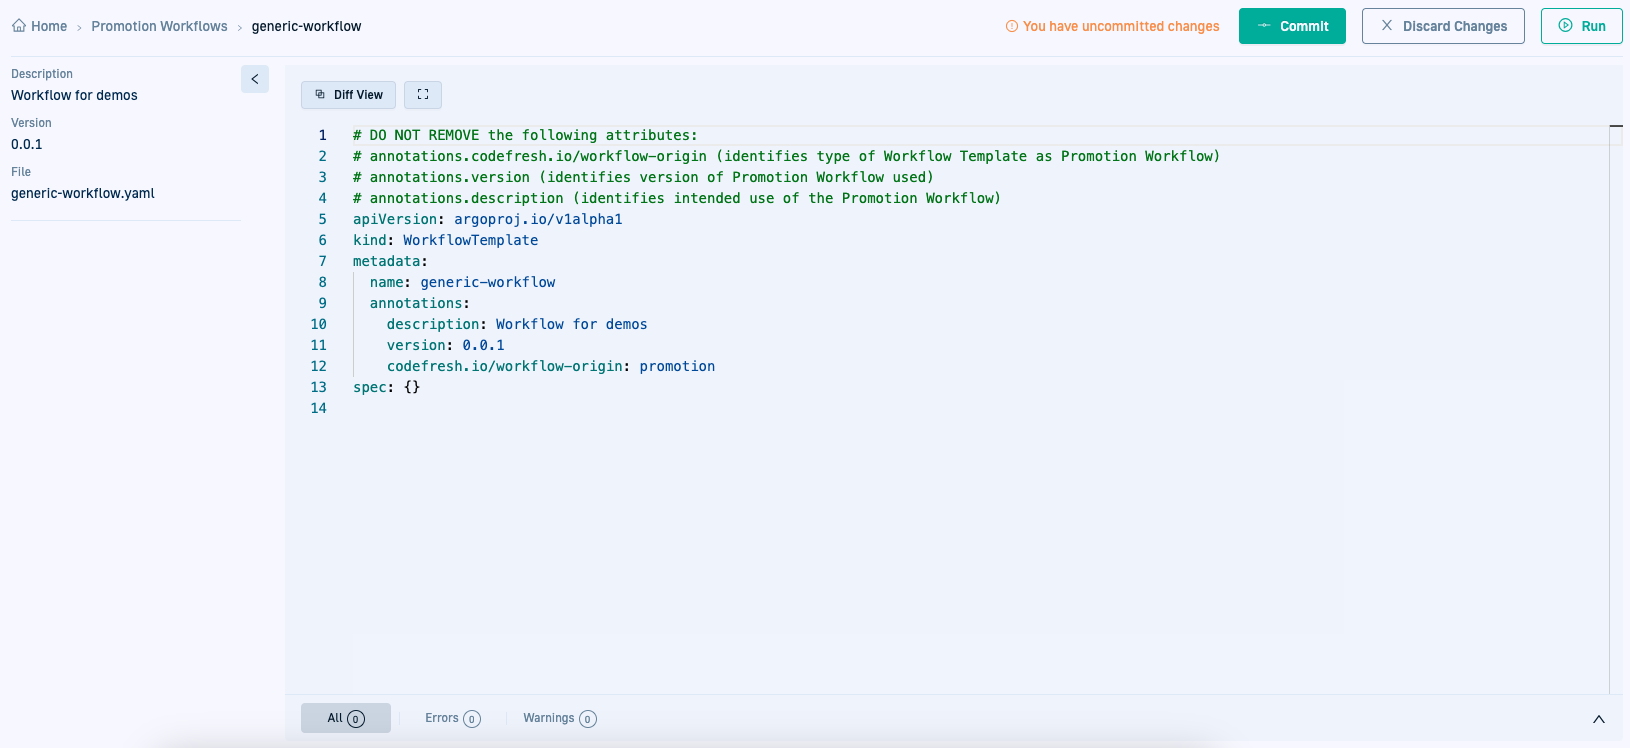
- Note the instructions at the top of the YAML file.
- If needed, change
metadata.annotations.version. The version is displayed in the Promotion Workflows list in the UI. You should update it manually when there are changes. - To test the Promotion Workflow with the current settings before committing the changes, click Run.
- Make any updates needed.
- Commit the changes.
When the YAML file is synced to the cluster, it is displayed in the Promotion Workflows list.
Arguments for Pre-Action and Post-Action Workflows
The table describes the parameters with default values passed to Pre- and Post-Action Workflows.
Some parameters are passed to both types of Promotion Workflows, while some parameters are specific only to Post-Action Workflows.
The same set of parameters are passed also for pull requests, after the pull request is merged.
At the simplest levels, you can display the details from the parameters in notifications. In more advanced scenarios, you can customize the Workflow execution based on specific parameters.
| Parameters | Description | Pre-Action Workflow | Post-Action Workflow |
|---|---|---|---|
APP_NAME |
The name of the specific application the Promotion Workflows and the Promotion Action pertain to. For example, trioapp-staging. |
✅ | ✅ |
APP_NAMESPACE |
The namespace where the application is deployed to. For example, gitops. |
✅ | ✅ |
REPO_URL |
The Git repository with the application settings, as defined in the application’s configuration. See Source settings for applications. | ✅ | ✅ |
PATH |
The relative path within the repository defined by REPO_URL to the directory or file containing the application’s configuration. See Source settings for applications. |
✅ | ✅ |
BRANCH |
The specific Git branch to which to promote changes. For example, main. |
✅ | ✅ |
RUNTIME |
The name of the GitOps Runtime the application being promoted is associated with. | ✅ | ✅ |
COMMIT_SHA |
The unique identifier (SHA) of the commit, generated by Git, including the precise set of changes addressed by the commit. Can be used as a trigger condition in Promotion Flows configured for a product. | ✅ | |
COMMIT_AUTHOR |
The name of the user who made the commit. Useful for tracking changes and for notifications. | ✅ | |
COMMIT-MESSAGE |
The text in the commit message associated with the code change that triggered the promotion, providing context for the changes introduced by the commit. | ✅ | |
COMMIT-DATE |
The date and time when the commit was made. Useful to correlate the commit with other events and understand the timeline of changes. | ✅ |
Promotion Workflow list
All Argo Workflows which include metadata.annotations: codefresh.io/workflow-origin: promotion are displayed in the Promotion Workflows list.
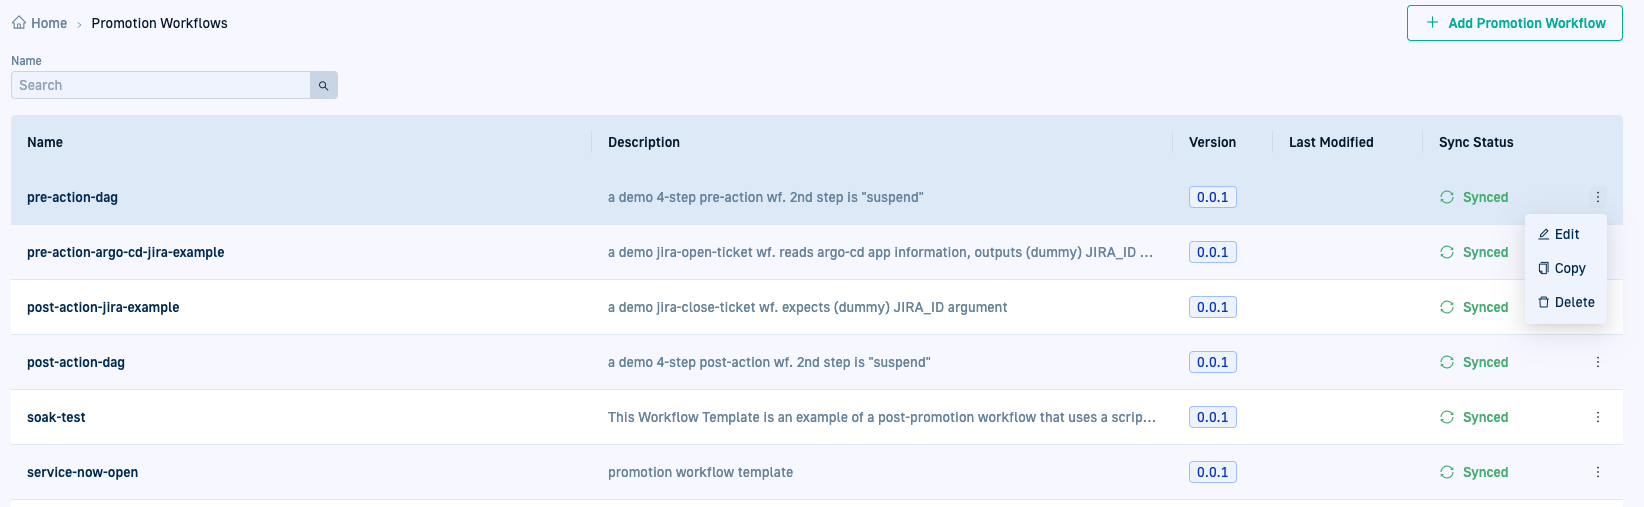
The Description and Version information are retrieved from the manifest if these are specified there.
The Promotion Workflows list is also the centralized location from which you can manage both Workflows and Workflow instances. See Managing Promotion Workflows and Managing Workflow instances.
Managing Promotion Workflows
After you create a Promotion Workflow, you can:
- Optimize the manifest by updating steps or refining the logic to better suit evolving requirements
- Locally validate the current version of the manifest with different values for parameters
- Copy and delete Promotion Workflows
Update Promotion Workflow manifests
Update and optimize the Promotion Workflow manifest including steps, actions, and parameters, to adapt to changing requirements.
When triggered, the Promotion Workflow uses the current version of the manifest, ensuring that the Workflow execution instance always uses the latest configurations and optimizations.
You can:
- Toggle between the Git State, Desired State, and Live State
- Render Diff views of all three states
- Update manifest
Changes to the manifest do not affect past execution instances as the manifest is updated independently of individual workflow executions.
How to
- In the Codefresh UI, from Promotions in the sidebar, select Promotion Workflows.
- Do one of the following:
- From the context menu of the Promotion Workflow select Edit.
- Click the name of the Promotion Workflow.
- In the Manifest tab, do any of the following:
- Identify Errors or Warnings if any.
- To make changes, make sure Git State is selected and then click Edit.
- To view the differences between the three states, click Diff View, and toggle between Full and Compact views.
Validate Promotion Workflow parameters
When you create a Promotion Workflow or modify the manifest of an existing workflow, you can validate the new workflow or the changes made before committing them to Git.
The Run option supplements the automatic inline validations, allowing you to verify parameter and confirm that the workflow behaves as expected, or change parameter values to test behavior.
The option runs the specific Promotion Workflow in the cluster, verifying all actions and steps in the workflow, such as sending notifications, running pre-action validations or post-action test.
- In the Codefresh UI, from Promotions in the sidebar, select Promotion Workflows.
- Click the name of the Promotion Workflow to validate.
- Click Run at the top-right. Codefresh displays the parameters passed in the Promotion Workflow.
- Modify as needed.
- Click Run at the bottom of the form.
Copy Promotion Workflows
Copy an existing Promotion Workflow to create a new Promotion Workflow with the same manifest configuration. (NIMA: when would you do this)
- In the Codefresh UI, from Promotions in the sidebar, select Promotion Workflows.
- From the context menu of the Promotion Workflow select Copy.
- Enter the Name, Description, and Resource Filename for the new Workflow.
- Update the manifest if needed.
- Commit the changes.
Delete Promotion Workflows
Delete unused legacy Promotion Workflows. Deleting a Promotion Workflow removes it from the Promotion Workflow list, from the Promotion Policies it is configured in, and from the Promotion Flows.
- In the Codefresh UI, from Promotions in the sidebar, select Promotion Workflows.
- From the context menu of the Promotion Workflow select Delete.
- Enter the name of the Promotion Workflow to confirm.
- Optional. Add a commit message and description.
- To confirm, click Commit & Delete.
Managing Workflow instances
Workflow instances are the specific execution instances of the Promotion Workflow.
You can:
- View instances of a Promotion Workflow
- Analyze the version of the manifest used for the instance with the configuration, parameters, artifacts (Workflow summary)
- Resubmit a completed or failed workflow (Workflow actions)
- Delete an instance (Workflow actions)
- Analyze individual steps of the workflow (Workflow steps)
- View detailed logs to troubleshoot execution (Workflow logs)

View/analyze Workflow instances
View instances of a Promotion Workflow. In addition to the status which is prominently displayed on the right for each execution instance, you can filter by products, environments and applications to get to the instances of interest to you.
- In the Codefresh UI, from the sidebar, select Promotion Workflows.
- Click a Promotion Workflow, and then click the Workflows tab to see its instances.
- If needed, filter by Status, Target Environment, Product, or Application.
- To visualize steps and view detailed information, click View Workflow Details.
Workflow summary
The Workflow Summary presents modular information for the selected Workflow instance.
The table highlights key information you can find in the Summary tab for a workflow.
| Workflow Summary | Description |
|---|---|
| Errors | Displayed when the Workflow instance has at least one failed step. |
| Summary | Namespace, memory and CPU resource usage, and execution context of the workflow. If triggered by a parent workflow, displays the link to that workflow. |
| Manifests | The version of the manifest used for the specific Workflow execution. This may not be the same version currently displayed in the Manifest tab. Useful to troubleshoot failed steps and errors in the execution instance. |
| Labels | Labels assigned to the workflow. Useful to filter, search, organize workflow executions. Examples: codefresh.io/app-name: trioapp-qa, codefresh.io/app-namespace: gitops. |
| Parameters | The inputs set/modified for the specific execution. Examples: Threshold: 50, Nb: 100. |
| Artifacts | The outputs if any generated by a workflow step, and can be logs, test-reports, binaries or any other type of file. Each artifact is associated with a specific step in the workflow. For example: main-logs: smoketests-k9ss6. |
Workflow actions
Depending on the status of the workflow instance, you can do the following:
- Resubmit: Rerun or re-execute the Workflow. Resubmitting a Workflow, creates a new instance of the Workflow. You can resubmit both successful and failed workflows.
- Retry: Rerun the workflow instance from the point of error. Unlike Resubmit, Retry does not create a new workflow instance.
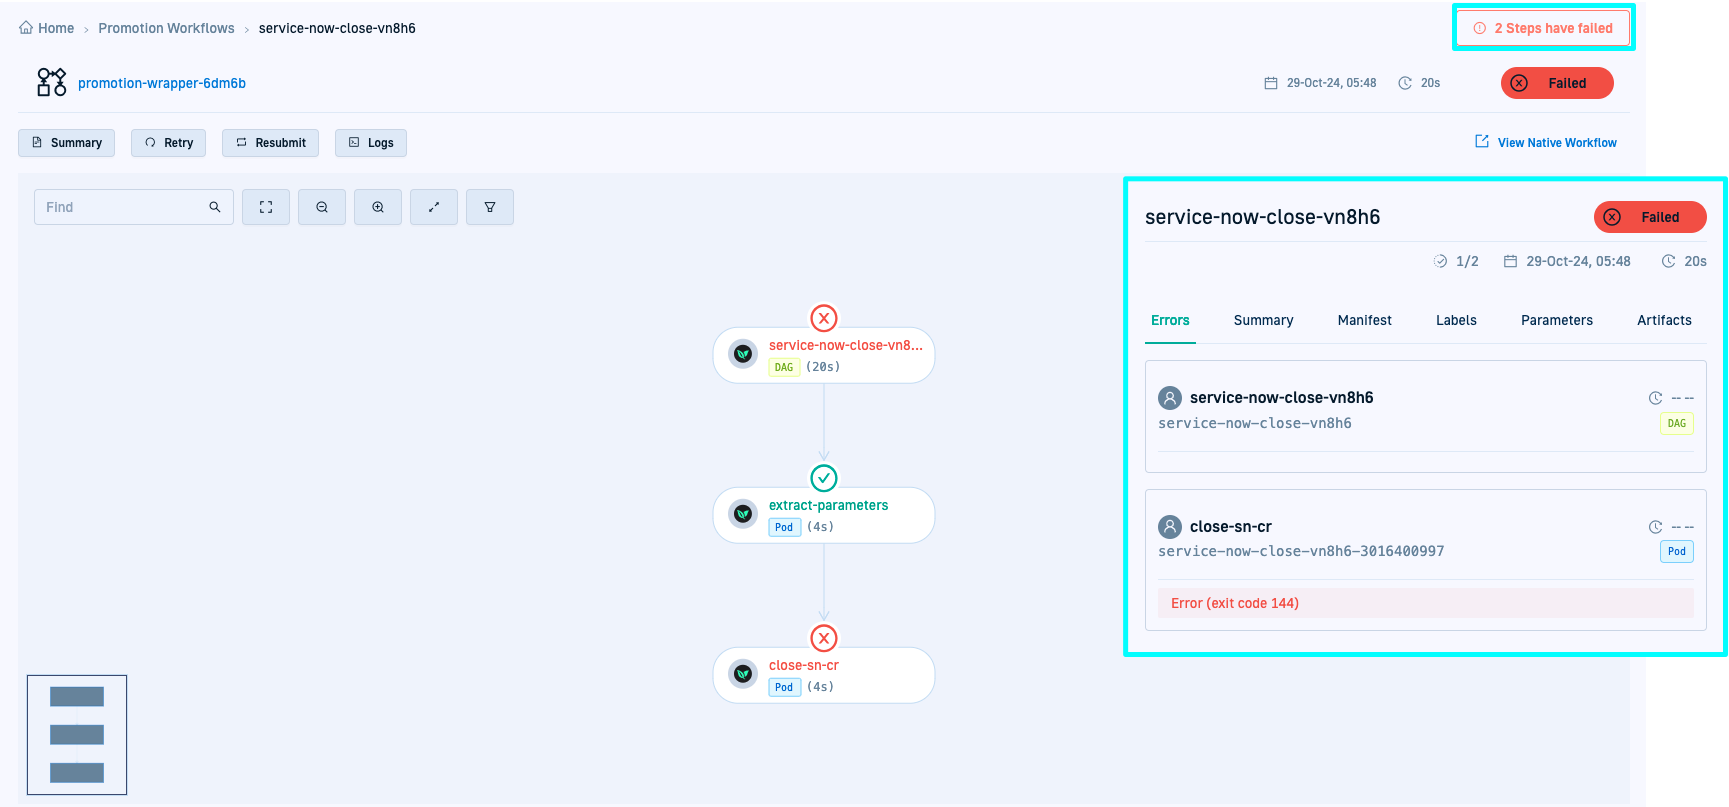
Workflow steps
Visualize the steps in the Workflow. For additional information on the step, click the step to open the pull-out panel.
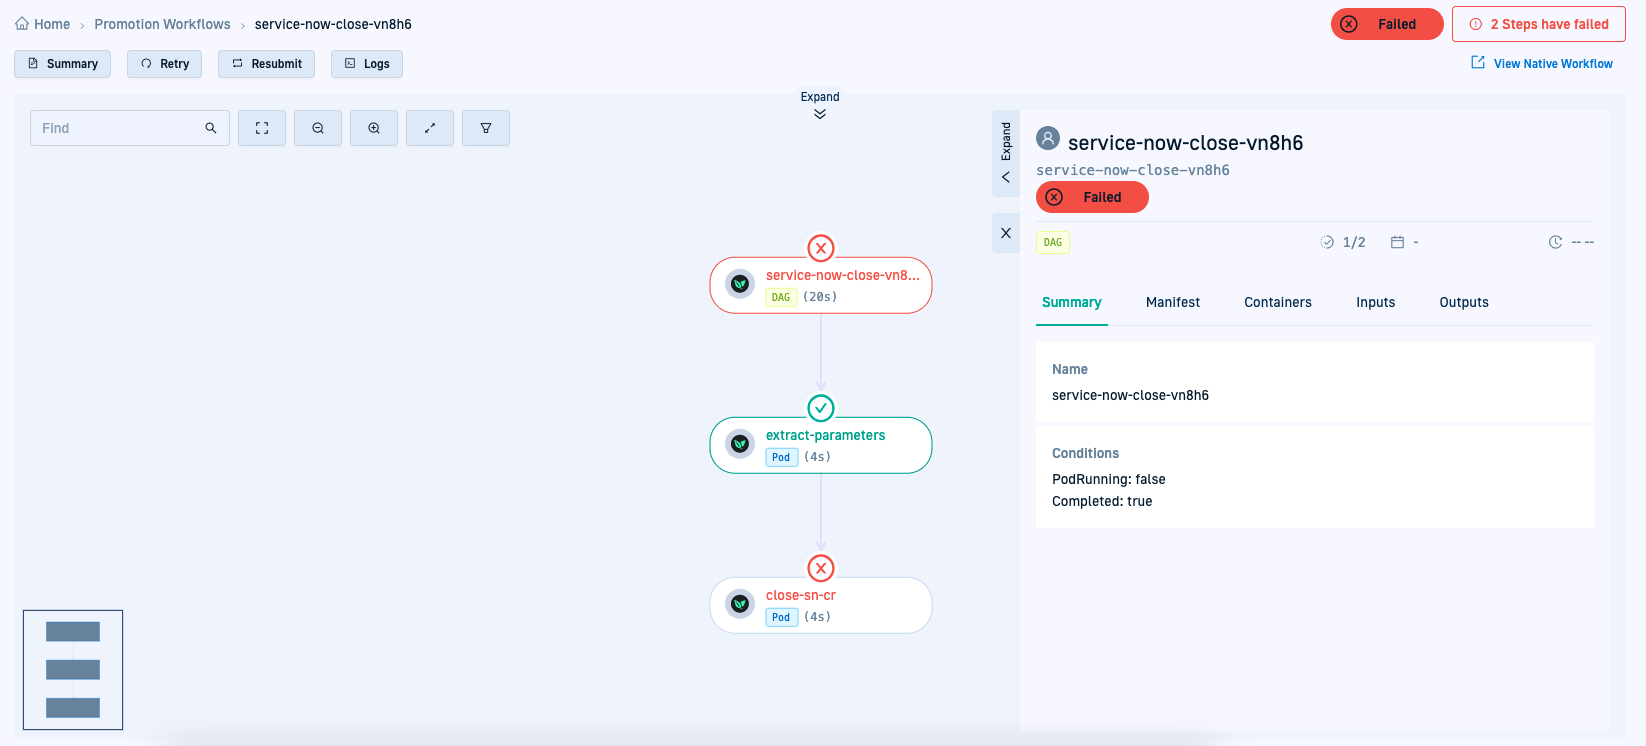
- The header displays the name of the step, its status, the step-type, the date of the most recent update, and duration.
- The tabs displayed differ according to the step type:
- The Summary, Manifest, Containers, Inputs, Outputs tabs are displayed for all almost all step types. (NIMA: what about Artifacts??)
- The Logs tab is displayed for Pod step types.
- Event-step types display Manifest, Summary, and Payload. For Cron and Unknown event types, only the Event Sources are shown.
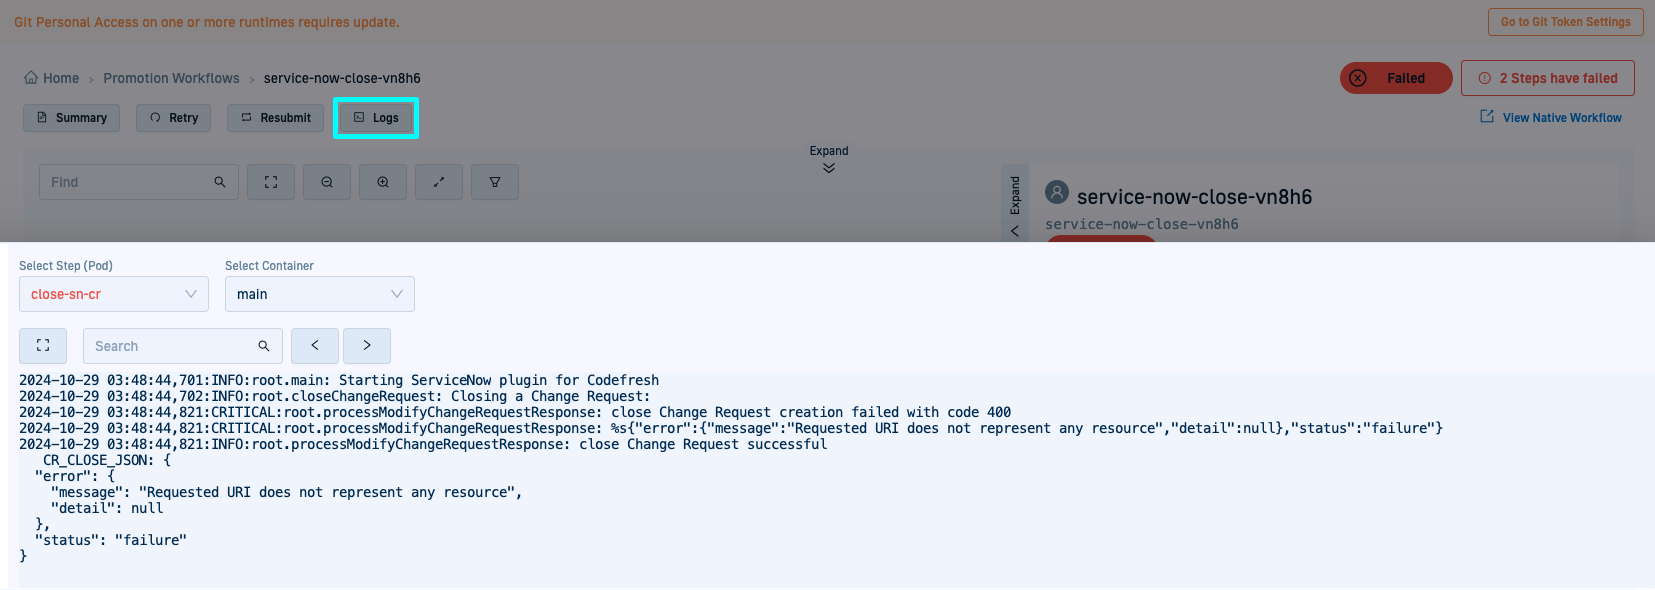
Workflow logs
View online logs for ongoing or completed Workflows. As with logs in any standard terminal, you can copy/cut/paste log info. The commands differ based on the OS.
- For an ongoing Workflow, view live logs for steps as they are being executed.
- For a completed Workflow, view logs for the Workflow, or for any step in the workflow.
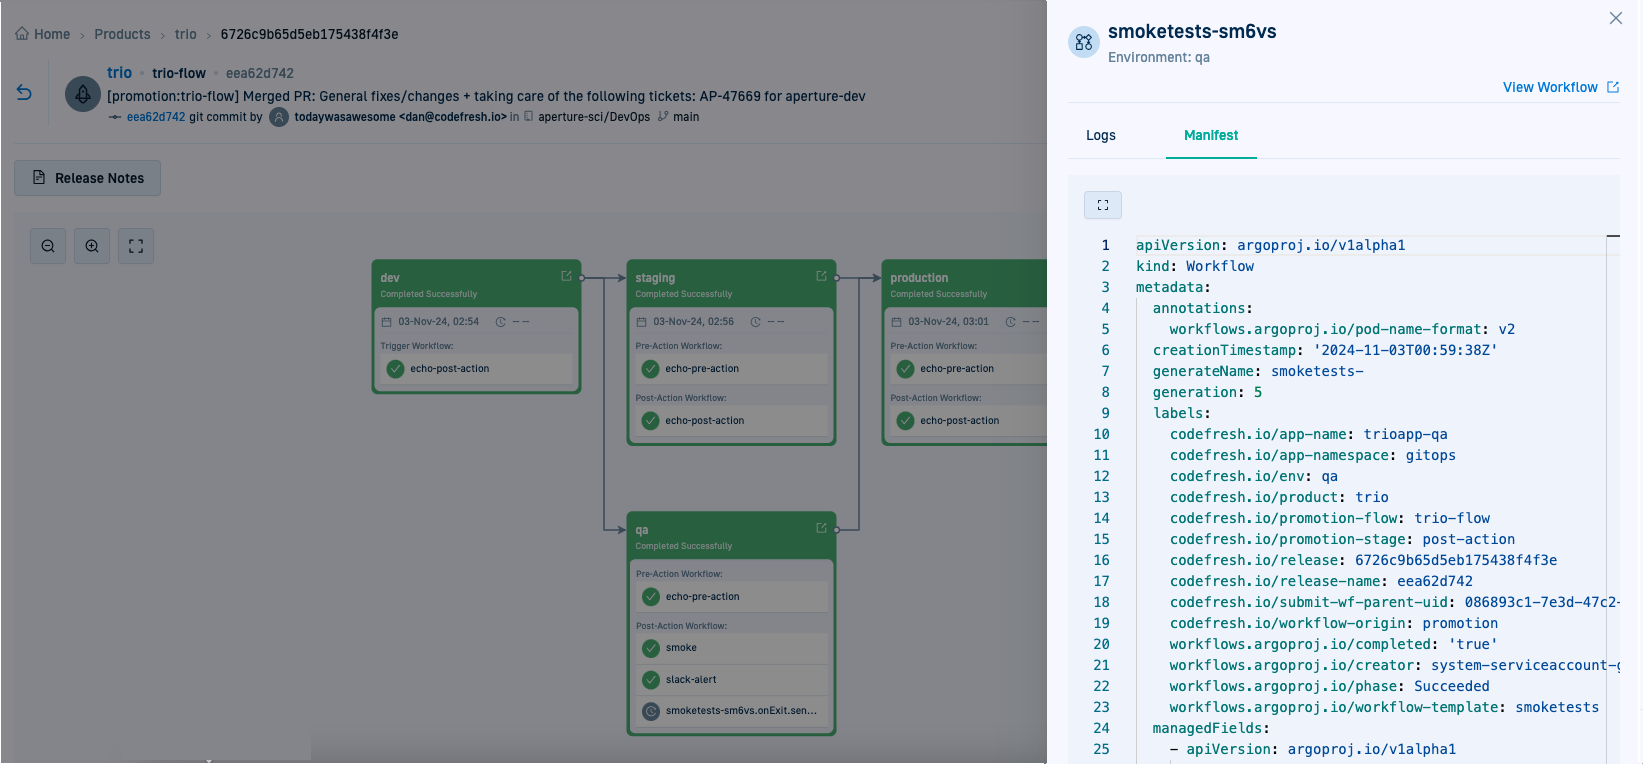
Promotion Workflows & steps in Releases
When a release is created for a promotion triggered automatically or manually, clicking the Release ID displays the ongoing or completed view of the promotion orchestration across the environment.
Each environment displays the Pre-Action or Post-Action workflows assigned to it. If a workflow execution is in progress, workflow steps are alsi displayed. The collective status of the workflows determines the promotion status of an environment.
See Promotion Workflows in product releases
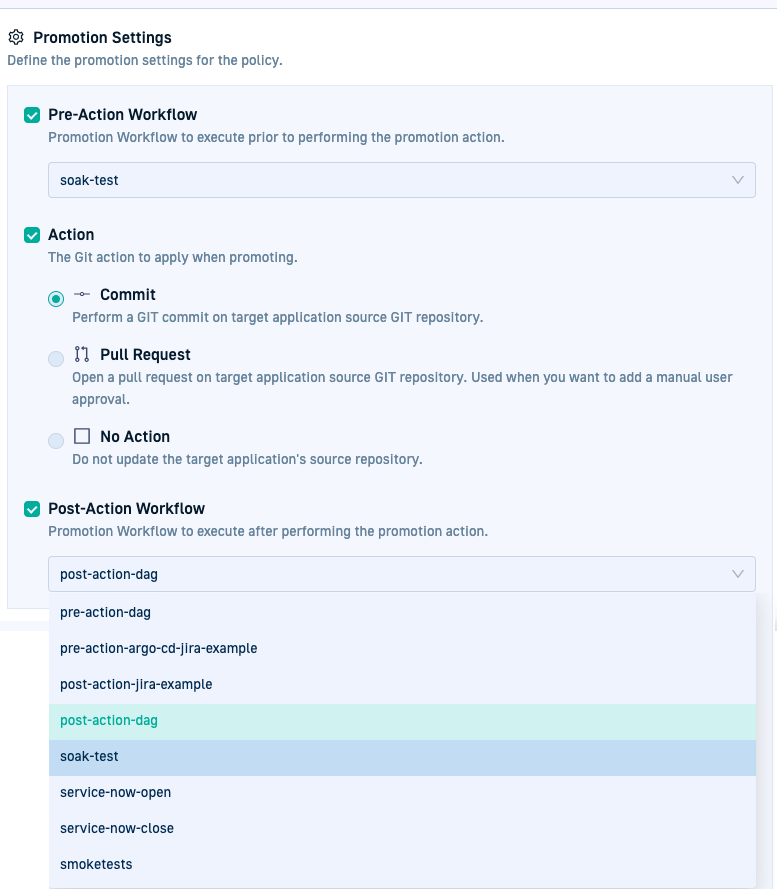
Promotion Workflows in Promotion Policies
Workflows are assigned on creating Promotion Policies. A Promotion Policy governs the promotion behavior for each environment. Accordingly, you can assign a Promotion Workflow to run for the environment before updating it with changes (Pre-Action Workflow), and after promoting the changes (Post-Action Workflow).
Related articles
Configure Promotion Flows
Configure Promotion Policies
Trigger promotions
Tracking product releases
Promotion sequences
About promotions