Configuring access control for pipelines
Restrict resources to pipelines in a company environment
Codefresh provides several mechanisms to enforce access control within your organization through user roles, CRUD privileges, and entity attributes such as tags. You can then create rules that combine roles, attributes, and CRUD (Create/Read/Update/Delete) privileges to create permissions.
-
Role-based access
Role-based access restricts access based on the who (the kind of user). Access is granted based on the user’s job responsibilities or position within an organization. Codefresh administrators can access UI functionality that you would deny to other users. For example, only account administrators can create and modify integrations with Git providers and cloud services, while other users can create, run, and modify pipelines. -
Attribute-based access control (ABAC)
Access control via attributes, restricts access to entities based on the what (the type of access). Assigning attributes or tags as they are also referred to, to Codefresh entities makes it easy to enforce a more flexible and secure form of access control.
For example, by adding tags to projects, you can enforce access control for pipelines through project tags, instead of relying on pipeline-level tags. So you can add tags to projects with pipelines that all teams can view and run (Read), but only the platform team can Create/Edit/Delete.
See ABAC for entities with tags and rules. -
YAML source and Git-repository access
YAML source and Git-repository access is a specialized form of access control that controls the Git repositories from which users can load pipeline definitions. See Git-repository access for pipeline definitions.
Let’s review the different access mechanisms in more detail, including privileges available for each entity, and examples of rule definitions.
Role-based access for users and administrators
Role-based access is usually defined when you add teams. Role-based access means assigning either a user or an administrator role.
NOTE
Only a user with an administrator role can add other users, and assign or change user roles.
The table below lists the functionality available for the Admin and User roles.
| Functionality | Available for Role |
|---|---|
| Run pipelines | User and Admin |
| View Docker images | User and Admin |
| Inspect text reports | User and Admin |
| Git Integrations | Admin |
| External Docker registry settings | Admin |
| External Helm repositories | Admin |
| Cloud provider settings | Admin |
| Cloud storage settings | Admin |
| Shared configuration | Admin |
| API token generation | Admin |
| SSO Settings | Admin |
| Runtime environment selection | Admin |
| Slack settings | Admin |
| Audit logs | Admin |
| ABAC for Kubernetes clusters | Admin |
| Billing and charging | Admin |
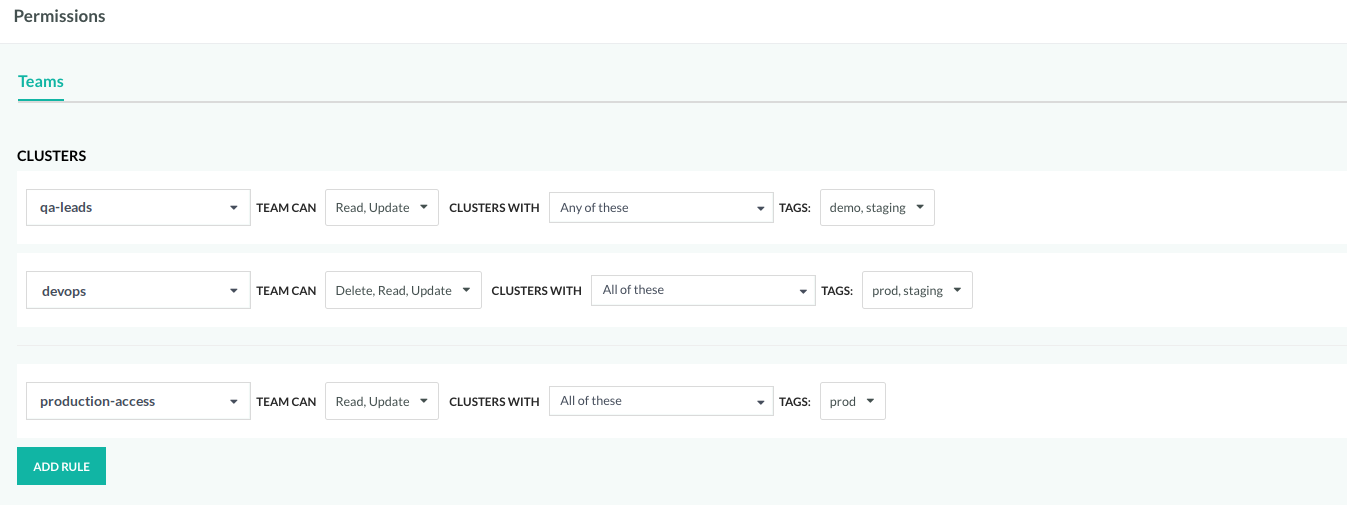
ABAC for entities with tags and rules
ABAC (Attribute-Based Access Control), allows fine-grained access to all entities, Kubernetes clusters, Codefresh pipelines, projects, and additional resources through the use of tags and rules.
For general information on ABAC, see ABAC on Wikipedia.
Tags
Tags give you the flexibility to assign entities and resources to specific teams while determining the type of access each team has. Tags serve as labels that help organize and control access to these entities and resources.
Tag names are entirely customizable and can align with your company’s processes and requirements. They can encompass a wide range of categories, including product names, software lifecycle phases, departmental designations, or labels designed to enforce security policies.
Rules
Rules combine teams (who), privileges (what), and tags (where) to create fine-grained access control policies.
Codefresh supports ABAC with the flexibility to use both OR and AND operations for tags.
Tags for entities
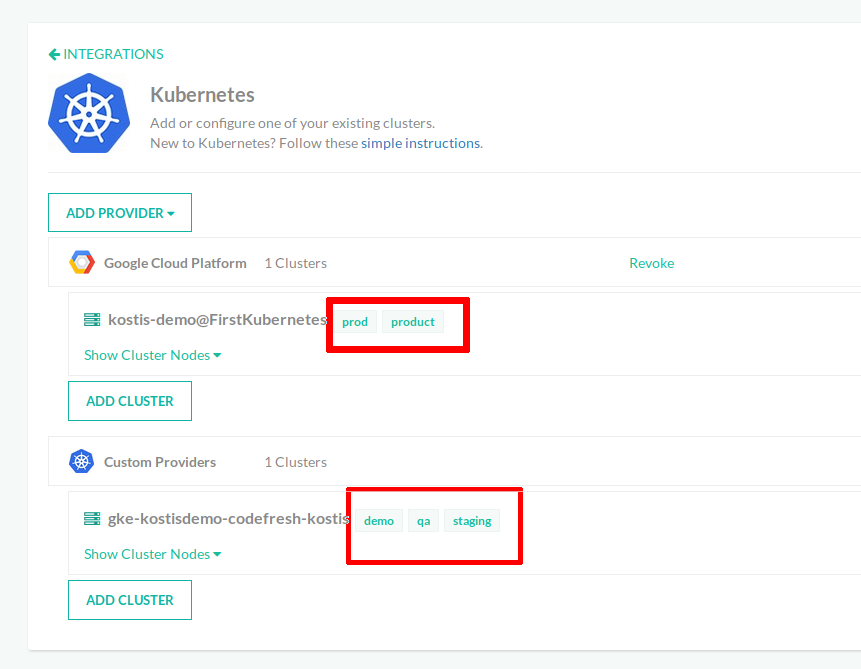
Assign tags to Kubernetes clusters and Git contexts
After integrating Kubernetes clusters/Git providers in Codefresh, you can add one or more tags to each cluster/Git provider. Adding tags makes it easy to define multiple policies for the same cluster, and Git provider which is also referred to as Git Contexts. For example, you can define access by project and by team.
- In the Codefresh UI, on the toolbar, click the Settings icon, and then from Configuration in the sidebar, select Pipeline Integrations.
- Click Configure for Kubernetes/Git to see the list of cluster/Git provider integrations (Git contexts).
- Select the integration for which to add tags, and on the right click Edit tags.
The Tags page displays existing tags if any.
The example below shows the Tags panel for a Kubernetes cluster integration.

- Click Add and type in the tag.
- Continue to add tags and when finished, click Save.
NOTE
By default, all clusters/Git integrations are displayed and can be modified by all users (but not deleted). As soon as you add at least one tag to a cluster/Git integration, it is only accessible to users with the required policy rules.
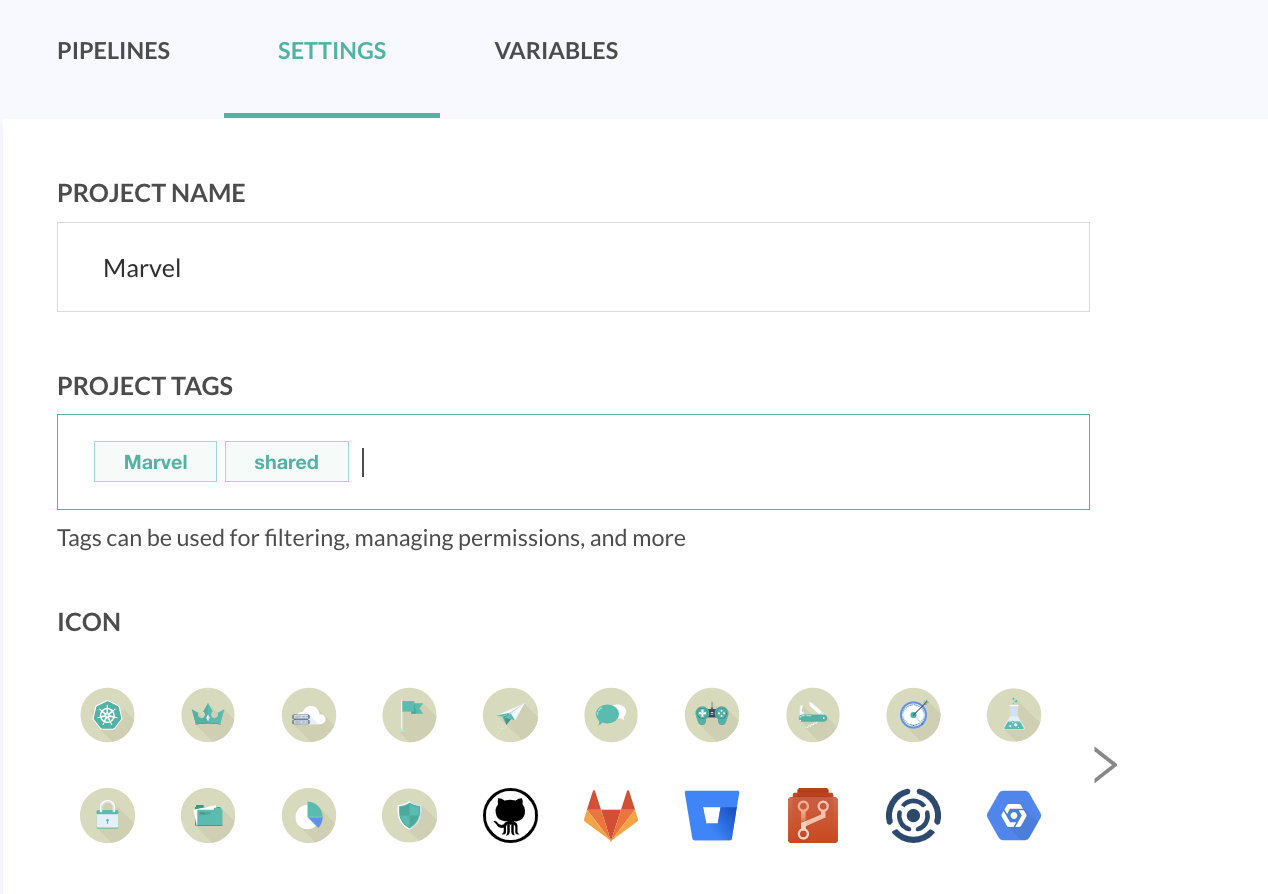
Assign tags to projects
Add tags to projects for filtering and defining permissions.
TIP
If Auto-create projects for teams is enabled in global pipeline settings for your account, then creating the team also creates a project and tag for the project, both with the same name as the team name.
- In the Codefresh UI, on the toolbar, from Pipelines in the sidebar, select Projects.
- Select the project for which to add tags, and then click the Settings icon on the right.
- In the Project Tags field, add as many tags as you need.
- When finished, click Save.
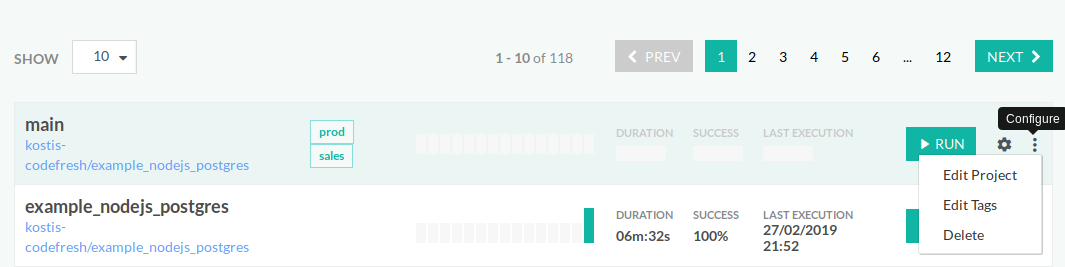
Assign tags to pipelines
Similar to other entities, you can also add tags to Codefresh pipelines.
- In the Codefresh UI, on the toolbar, click the Settings icon, and then from Pipelines in the sidebar, select Pipelines.
- Select the row with the pipeline for which to add tags, and then from the context menu on the right, select Edit Tags.
- When finished, click Save.
Assign tags to Shared Configurations
Shared configuration can be environment variables, Helm values, encrypted secrets for access tokens and YAMLs.
- In the Codefresh UI, on the toolbar, click the Settings icon, and then from Configuration in the sidebar, select Shared Configuration.
- In the row with the configuration for which to add tags, click the tag icon on the right.
- Type in the tag, press Enter, and continue to add the tags you need.
- When finished, click Save.
Rules for access control
Define rules using the who, what, where pattern to control access to entities and resources. Rules can be based on OR or AND relationships.
For each rule, select:
- The team the rule applies to
- The CRUD (Create/Delete/Read/Update) privileges the team has to the entity/resource
- For almost all entities, the Create privilege requires a separate rule.
- The other privileges can be defined in the same rule.
- The tags that control access to the entity/resource:
- Any tags (
any): Grants access to entity as long as it has a tag. The tag name is not relevant. - All named tags (
all of these): AND logic between list of defined tags. Grants access only to the entities with all the tags defined in the list. - Any named tag (
any of these): OR logic between list of defined tags. Grants access to the entity with at least one of the tags defined. - No tags (
no): Grants access to the entity without any tags.
- Any tags (
The examples in this section illustrate how to control access to projects and to pipelines through project tags:
- Example 1: Create rule to define access to projects by teams
- Example 2: Create rule to define access across teams to pipelines by projects and project tags
Define rules for entities/resources
Before you begin
Make sure you have:
- Created at least one team
- Added tags for all entities, except pipelines
How to
- In the Codefresh UI, on the toolbar, click the Settings icon.
- On the sidebar, from Access & Collaboration, select Permissions.
- For each entity, do the following to define a rule:
- Select the team to which assign the rule.
- Select the privileges to assign to the team for that entity.
NOTE
You cannot select the Create privilege together with the other privileges. The Create privilege requires a separate rule.
Any indicates no privileges are selected. - To determine tags, select one of the following:
- Any: Allows access to entities with any tag, regardless of the actual tag names.
- All of these tags: Allows access only to those entities with all the tags defined in the list (AND relationship between the tags). Access is denied if the entity does not all the tag names.
- Any of these tags: Allows access only to those entities with any of the tags defined in the list. Access is allowed if the entity has at one of the tag names.
- No tags: Allows access only to entities that do not have tags assigned to them.
CRUD privileges for entities/resources
CRUD privileges define Create/Read/Update/Delete permissions for the entity. Specific entities can have additional or different permissions.
NOTE
You cannot grant Create privileges together with other privileges.
Anyindicates that none of the privileges are granted.
| Entity | Privileges |
|---|---|
| Cluster | Create: Granted to account administrators only. Read: View cluster integrations. Update: View and edit existing allowed cluster resources, including installing, removing, and rollback Helm charts. Tags are managed from account settings, so this permission doesn’t apply to it currently. Delete: Granted to account administrators only. |
| Project | Create: Create projects, and add tags to the projects. Read: View projects. Update: View and edit projects, including the tags assigned to them. Delete: Delete projects. |
| Pipeline | There are two levels of permissions for pipelines:
|
| Chart | Read: View Helm charts |
| Git contexts | Git contexts refer to the permissions to create and manage integrations with Git providers and use them in pipelines. Tags are used to control access to teams and execution contexts. Create: Add integrations to Git providers. Update: View and edit Git provider integrations, including editing the tags assigned to them. Delete: Delete Git provider integrations. Use: Create triggers in pipelines for Git provider Retrieve YAML definitions from a repository Use a Git integration in pipelines, in the git-clone step for example, via Execution Context. |
| Shared configs Secrets YAMLs |
Shared configuration permissions relate to managing:
Create: Create unencrypted or encrypted Shared Configuration, Shared Secret, Shared YAML, Shared Secret YAML. Read: View unencrypted or encrypted Shared Configuration, Shared Secret, Shared YAML, Shared Secret YAML. Update: View and edit unencrypted or encrypted Shared Configuration, Shared Secret, Shared YAML, Shared Secret YAML. Delete: Delete unencrypted or encrypted Shared Configuration, Shared Secret, Shared YAML, Shared Secret YAML. |
About pipeline permissions by project tags
Create rules for pipeline entities by project tags instead of pipeline tags.
This option gives you almost unlimited flexibility in enforcing access control for pipelines without compromising security, as you can now define access scopes for pipelines on the basis of the projects that house the pipelines. Instead of tagging each pipeline, you tag the project. New pipelines in the project inherit those permissions.
It also reduces the effort and time to create and maintain permissions for teams and entities. You can define which teams have no access, partial access (Read and Run), and full access.
Users without access to a pipeline cannot view or run its builds.
Example 1: Create rule to define access to projects by teams
This example illustrates how to create rules for projects and restrict access by teams.
Scenario:
We have two projects and we want to restrict access to them based on the tags assigned to the projects.
We want:
- All teams to have Read permissions to projects with tag
shared - Only the DevOps team to have full permissions to projects tagged with
DevOps
Step 1: Enable Auto-create projects for teams: This option, available as an account-level pipeline setting, avoids the need to create a project after creating the team. It automatically creates the project:
- With the same name as the team
- Adds a tag identical to the team name
- Creates a project rule and a pipeline rule
See Auto-create projects for teams.
- Go to Pipeline Settings, and make sure that Auto-create projects… is enabled.
Step 2: Create the DevOps team
Now we’ll create the two teams, DevOps and Users.
- Create the DevOps team. See Teams in Codefresh.
- Go to Projects. You’ll see that we already have a project DevOps, with a tag, also DevOps.

- Create a new team, Users.
Step 3: Create the projects
We will need to create only one project, as the DevOps project has already been created with the DevOps tag.
- Create a project:
Sandboxand assign tagshared. See Create project for pipelines.
Step 4: Define the project rules
Finally, we’ll define the rules for the DevOps and ‘Sandbox projects.
- For team DevOps:
- Modify the existing Project rule with Read access to also allow Delete and Update access to projects with the
DevOpstag, andAll tags. - Create a Project rule with Create access to projects with
All tags. Note that this tag includes those projectswithout tagsas well.
- Modify the existing Project rule with Read access to also allow Delete and Update access to projects with the
- For team Users:
- Create a Project rule with Read access to all projects with
sharedtags.
- Create a Project rule with Read access to all projects with
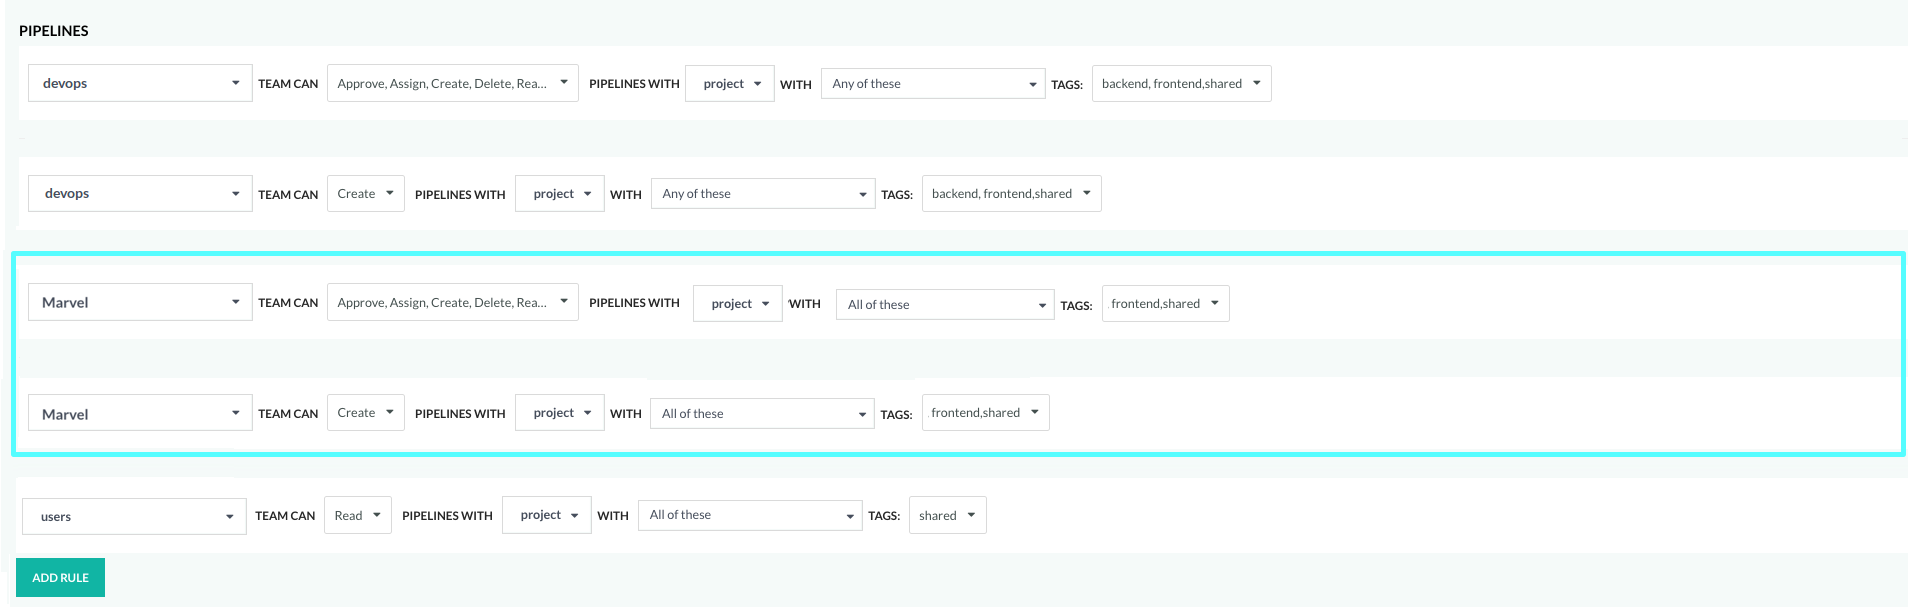
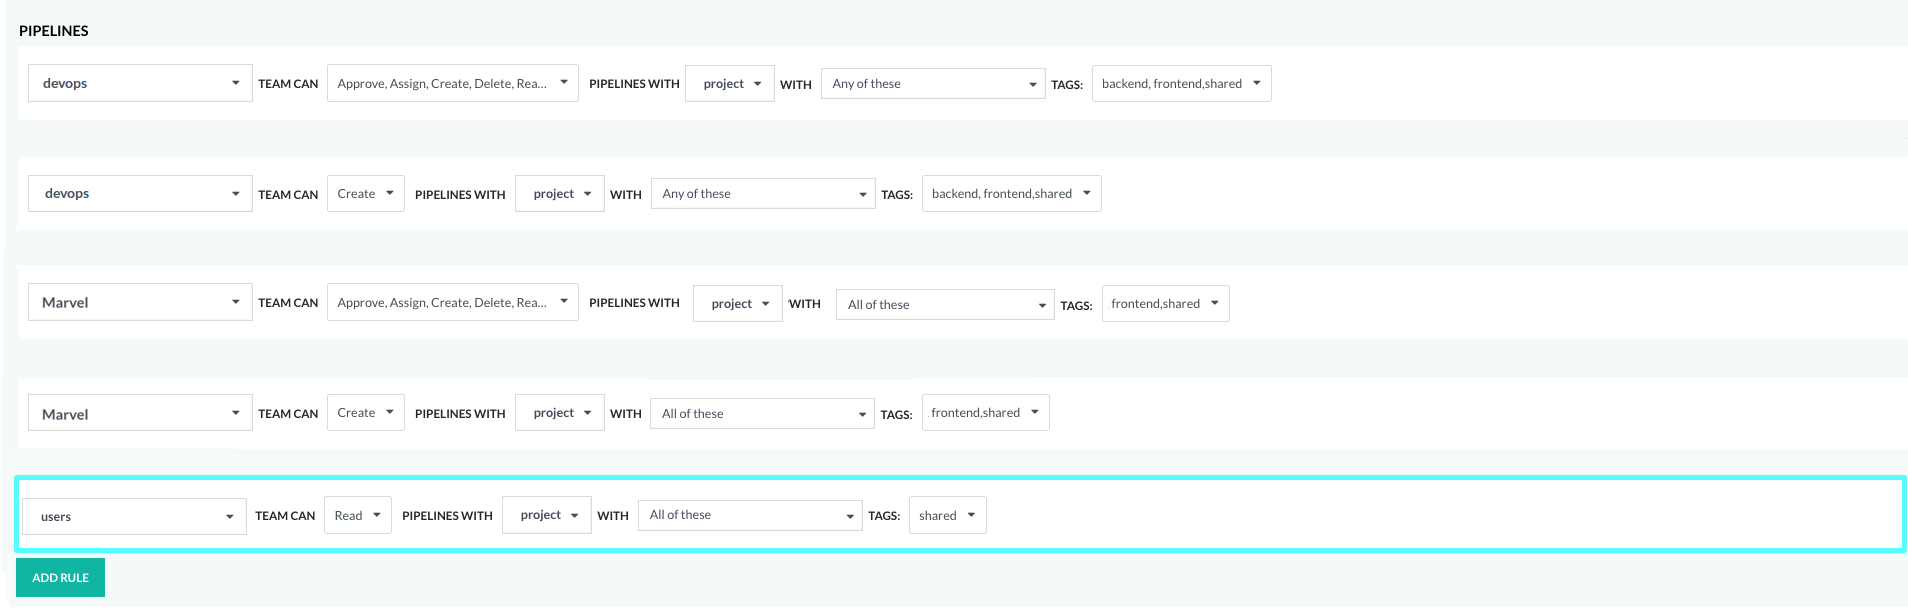
Example 2: Create rule to define access across teams to pipelines by projects and project tags
This example illustrates how to define rules to enforce access control for pipelines by project tags. We will assign tags to the different projects that house different pipelines. Instead of adding tags to each pipeline, which means that you need to add the same tags every time you create a new pipeline in the project, we will add tags to the projects that house the pipelines.
Scenario
We have three teams: DevOps, Marvel, and Users.
We want:
- Teams DevOps and Marvel to be able to create and modify their own pipelines, and view and run all pipelines
- Team User to view and run only specific pipelines
Step 1: Set up the teams
The first step is to create the teams, and add the users you want to each team.
See Teams in Codefresh.
If you have already created the DevOps and Users teams, you’ll need to create the Marvel team.
Step 2: Create the projects and assign tags
Now we’ll create three projects, with different tags. See Create project for pipelines.
- Project:
Platform; Tag:backend - Project:
Frontend; Tag:frontend - Project:
Shared; Tag:shared
Step 3: Define the rules
As the final step, let’s define the rules that govern access to pipelines in projects through the project tags.
We’ll first define the access requirements for the pipelines:
- Team
DevOpshas full permissions for pipelines in all projects with any of these tags (OR relationship):backend,frontendandshared - Team
Marvelhas full permissions for pipelines in all projects with all of these tags (AND relationship)frontendandshared - Team
Userscan view and run pipelines in all projects with all of these tags (AND relationship)shared
NOTE
We are defining rules for pipelines with project tags instead of pipeline tags.
Here’s how you would define the rules: We need to define a Create rule each for teams DevOps and Marvel, and then different rules for the three teams with the other permissions.
- For team DevOps:
- Rule 1: Create pipelines in projects with any of these tags:
frontendORbackendORshared. - Rule 2: All other permissions for pipelines in projects with any of these tags:
frontendORbackendORshared.
- Rule 1: Create pipelines in projects with any of these tags:
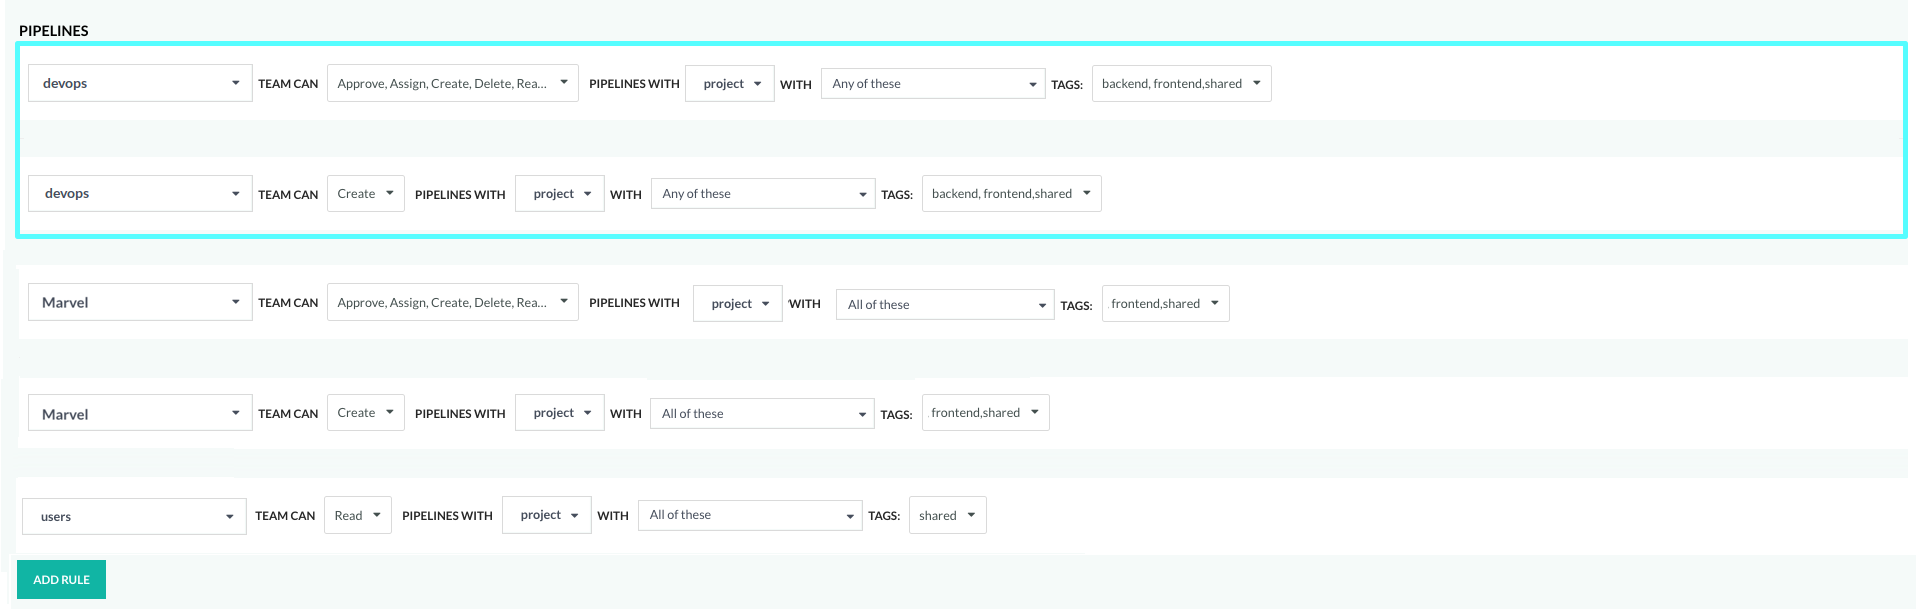
- For team Marvel:
- Rule 1: Create pipelines in projects only with all of these tags: both
frontendANDshared. - Rule 2: All other permissions for pipelines in projects only with all of these tags: both
frontendANDshared.
- Rule 1: Create pipelines in projects only with all of these tags: both
- For team Users:
- Rule: View and run for pipelines in projects only with all of these tags:
shared.
- Rule: View and run for pipelines in projects only with all of these tags:
Git-repository access for pipeline definitions
Enforce access control for pipeline definitions:
- At the account level by disabling the YAML sources from which to load and use pipeline definitions
- Configuring restrictions to Git repositories through the integration settings for your Git provider
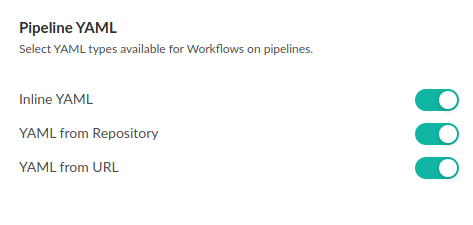
Enable/disable access to pipeline YAMLs by source
Enable or disable access to pipeline definition YAMLs based on the source of the YAMLs.
These settings are effective for all pipelines in an account.
When creating a pipeline, users can by default use/load pipeline definitions from any of the following:
- Inline YAML: The inline YAML editor in the Workflows tab. Disabling this option prevents users from modifying existing pipelines, and creating new pipelines through the Codefresh inline YAML editor. The Run button is also disabled for all such pipelines.
- YAML from repository: Any Git repository connected to Codefresh.
- YAML from URL: Any public URL.
TIP
You can further restrict access to Git repos, as described in Define access to Git repositories for pipeline YAMLs.
How to
- In the Codefresh UI, on the toolbar, click the Settings icon.
- From Configuration in the sidebar, select Pipeline Settings.
- Turn on or off the options as needed.
Define access to Git repositories for pipeline YAMLs
If access to pipeline definitions are enabled for Git repositories, you can configure fine-grained restrictions through the integration settings for your Git provider.
By default, if configured for the account, users can also load pipeline definitions from any private or public Git repository when creating a pipeline. You can restrict this behavior to allow access to selected repos, to folders within repos, to selected branches, or even completely disable loading pipeline definitions from Git repositories.
- In the Codefresh UI, on the toolbar, click the Settings icon.
- From Configuration on the sidebar, select Pipeline Integrations.
- Select the Git provider integration, click Edit.
- Scroll down and expand YAML Options.

- Configure restrictions for Git repositories that can be used for pipeline definitions:
- Allow only the following repositories: Toggle Manual selection to on, and then select the Git repos, or define a regex according to which to select repos.
- Allow only the following branches: Select Git repositories by the branches that match the regex. For example, this regex
/^((pipeline-definition)$).*/g, allows users to load pipeline YAMLs only from a branch namedpipeline-definitionin a Git repository. - Allow only the following paths: Select Git repositories by folders within the repo that match the glob pattern).
Related articles
Codefresh Provider for Terraform
Managing your Kubernetes cluster